大前端
- useIoC——仅一百多行代码实现前端的依赖注入
- useIoC答疑 & 对children属性的深入挖掘
- useI18n——基于依赖注入实现国际化功能
- useResource:声明式API与useMock基于依赖注入的mock工具
- 基于ffmpeg开发在线视频播放器
useIoC——仅一百多行代码实现前端的依赖注入
前言
对于一个从事7年Java的开发者来说,Spring依赖注入已经变成日常开发工作的一部分,尤其是最近三年切换Go技术栈更是怀念,尽管有些老员工总是忽悠我Go不是面向对象的语言,所以不需要依赖注入。
示例
为什么说他们在忽悠?以下面代码 demo_controller.go 为例:
func NewDemoController(demoService DemoService) *DemoController {
  return &DemoController{
    demoService: demoService
  }
}

struct DemoController {
  demoService DemoService
}

func (d *DemoController) Hello() Response {
  id := d.Ctx.getString(":id")
  if person, err := d.demoService.GetPerson(id); err != nil {
    return Reponse.Error(404, "can not this person")
  }
  return Response.Success(fmt.Sprintf("hello, %s", person.name))
}
然后编写单元测试用例 demo_controller_test.go
struct FakeDemoService {
  person: *Person
  err: error
}

func (f *FakeDemoService) GetPerson(id: string) (*Person, error) {
  return f.person, f.err
}

func Test_demoController_Hello_Success(t *testing.T) {
  fakeDemoService := &FakeDemoService{
    person: &Person{Name: "Joe"},
    err: nil
  }
  controller := NewDemoController(fakeDemoService)
  resp := controller.Hello("1234")
  assert.Equalf(t, resp.code, 200, "status code should be 200")
  assert.Equalf(t, resp.msg, "hello, ", "status code should be 200")
}

func Test_demoController_Hello_Failed(t *testing.T) {
  fakeDemoService := &FakeDemoService{
    person: nil,
    err: fmt.Errorf("Not Found")
  }
  controller := NewDemoController(fakeDemoService)
  resp := controller.Hello("1234")
  assert.Equalf(t, resp.code, 404, "status code should be 404")
}
以上的测试用例,充分说明依赖注入的重要性,尤其是在追求高代码测试覆盖率的前提下。
尽管是手动依赖注入,但远比给测试代码 打桩 优雅多了,所以那些嘲笑 Java 开发者离开 Spring 就无法写出优雅代码的人可以闭嘴了!
例外
然而有些场景使用全局变量或有副作用的函数,就必须对有副作用的函数使用打桩工具,才能保证测试用例可重复执行。如下:
// 如果file文件刚好存在就不会返回错误,但无法保证每次执行的结果都一致
func DeleteFile(file: string) error {
  return os.Rm(file)
}
由此可见,那些宣称 只有面向对象才需要依赖注入 的人都是在装疯卖傻,严格来说 打桩 也是一种非常不优雅的依赖注入。
总结
在我看来,面向对象 OOP 编程思想最大的贡献是把 全局变量 这个万恶之源给钉死在耻辱柱上,这个恰恰是许多初学者在接触 面向过程 最容易染上的陋习。
许多宣称面向过程不需要依赖注入的人,恰恰是使用全局变量代替依赖注入。
Spring 则是把这个陋习给公开化,尽管 Spring 的单例模式也有全局变量的意思,但在 ThreadLocal 的支持下,也部分解决多线程并发环境单例模式可能会存在的线程安全风险,最典型的例子就是Java八股文经常会问到的日期格式化工具 要怎么解决线程安全问题
然而受到面向对象的局限,Spring虽然能解决全局变量的问题,但依然无法做到尽善尽美,因为面向对象的思想忽略了非常关键且致命的 Side Effect 副作用。
React 代码复用之路
当React 推出 Hooks 时,社区的评价可以分为两类:一是 Mixin 和 HOC 的替代品,二是 Monad 的替代品。
先说 Mixin 和 HOC 的替代品,其实当我第一眼看到 Mixin 的时候,我的第一反应是 面向对象 和 依赖注入 都诞生这么多年,前端搞代码复用为啥不借鉴一下?
例子
假设要你写一个计算两点之间距离的函数,以下是面向过程的写法:
// 求实数轴上两点之间的距离
function distance(p1: number, p2: number): number {
    return Math.abs(p1 - p2)
}
然后,需求又变了,要求增加对平面二维、立体三维的支持:
// 求二维平面上两点之间的距离
function distance2(x1: number, y1: number, x2: number, y2: number): number {
    return Math.sqrt(Math.pow(x1 - x2, 2) + Math.pow(y1 - y2, 2))
}
// 求三维空间中两点之间的距离
function distance3(x1: number, y1: number, z1: number, x2: number, y2: number, z2: number): number {
    return Math.sqrt(Math.pow(x1 - x2, 2) + Math.pow(y1 - y2, 2) + Math.pow(z1 - z2, 2))
}
但说实话,这样写法看起来实在太蠢了,于是写了个通用的计算距离的函数:
// 通用函数
// 缺点:不同的类型不能比较,无法在编译期报错,只能在运行期抛出异常
function genericDistance(p1: number[], p2: number[]): number
    if (p1.length == 0 || p2.length == 0) {
        throw Error("length must greater then zero.")
    }
    if (p1.length != p2.length) {
        throw Error("p1's length must equals p2's length.")
    }

    let sum = 0;
    for (let i = 0; i < p1.length; i++) {
        sum += Math.pow(p1[i] - p1[i], 2)
    }
    return Math.sqrt(sum)
    }
这样一来,问题是解决了,但当 p1 和 p2 的长度不同时编译器应该报错,而不是到运行时才抛出异常。
面向对象
既然 面向过程 无计可施,那么我们可以用 面向对象 来试试
// 定义接口
interface Distance {
    distance(p: P): number
}
// 二维平面点
class Point implements Distance {
    x: number
    y: number
    constructor(x: number, y: number) {
        this.x = x;
        this.y = y;
    }
    distance(p: Point): number {
        return Math.sqrt(
            Math.pow(this.x - p.x, 2)
            + Math.pow(this.y- p.y, 2)
        )
    }
}
// 三维立体点
class Cubic implements Distance {
    x: number
    y: number
    z: number
    constructor(x: number, y: number, z: number) {
        this.x = x;
        this.y = y;
        this.z = z;
    }
    distance(c: Cubic): number {
        return Math.sqrt(
            Math.pow(this.x - c.x, 2)
            + Math.pow(this.y- c.y, 2)
            + Math.pow(this.z - c.z, 2)
        )
    }
}
看起来很简单,但却很好地解决 一维、二维 和 三维 的点明明不能直接比较,却还得抛出异常的问题。
代码复用
然后还可以轻松实现代码复用,假如说需求更改了,要求你把计算距离的算法换成 “曼哈顿距离”:
// 平面曼哈顿距离
class ManhattanPoint extends Point implements Distance{
    distance(mp: ManhattanPoint): number {
        return Math.abs(this.x - mp.x) + Math.abs(this.y- mp.y)
    }
}
// 立体曼哈顿距离
class ManhattanCubic extends Cubic implements Distance{
    distance(mc: ManhattanCubic): number {
        return Math.abs(this.x - mc.x) + Math.abs(this.y- mc.y) + Math.abs(this.z - mc.z)
    }
}
Class Component
如果到了这里,你还是有疑问,毕竟不能直接套用到真实的前端开发中,那么请看以下代码:
假设我们要写一个 Button 组件,然后复用它的代码,派生出一个 IconButton
import { Component, ReactNode } from "react";

export class Button extends Component {
    onClick?: () => void
    children?: ReactNode
    constructor(onClick?: () => void, children?: ReactNode) {
        super({});
        this.onClick = onClick ?? () => {};
        this.children = children;
    }
    render() {
        return {this.children};
    }
}

export class IconButton extends Button {
    constructor(icon: string, onClick?: () => void, children?: ReactNode) {
        super(onClick, children);
        this.children = <><i>icon</>{this.children}</>;
    }
}
这样的写法可比 Mixin 优雅多了,和 HOC 写法差不多,但 HOC 的缺点是嵌套层数太多,面向对象的写法也有类似的问题,但是别忘了 面向对象 还有一招 依赖注入 。
困难
对 Spring 熟悉的人,很容易想到通过依赖注入不同的 children 就得到不同的 Button 实例,注入带 Icon 的 children 就可以得到 IconButton ,比 HOC 还优雅!
说起来容易但做起来却非常困难,且不说 TypeScript 的 Decoration 获取具体的类型非常困难,而且 Spring 要求构造函数的参数必须为空,就和现有的前端代码产生非常大的冲突;
更令人难受的是 React 项目默认开启 use strict; , this 全变成 undefined ,class component都没办法写,所以照搬 Spring 肯定是不行的。
代数效应
山重水复疑无路,柳暗花明又一村
React 官方介绍 Hooks 还提到 Algebraic Effects 代数效应,在查询相关资料的过程,有人评价:简单理解,代数效应就是依赖注入。
我心中暗喜,既然React 官方还是回到依赖注入的康庄大道,那我背 Spring 八股文就有用武之地了。
通过Hook实现依赖注入
约束
首先,必须说清 Spring 依赖注入已知的限制:
- 被注入对象的构造函数参数必须为空
- 一般情况,一个application只有一个context
为了解决以上问题,因此对Hook实现依赖注入进行以下限制:
- 被注入IoC容器的不再是实例,而是构造函数,构造函数的参数只有一个,必须是Object类型
- 每个组件都会绑定一个独立的context,在组件树中父级组件可以影响向子组件注入的依赖
第一点的限制,完全兼容 React 官方的 FunctionComponent 约束,所以铁子们不能担心兼容性问题;
第二点的限制,更确切的说法是增强,目的为了解决组件套娃的情况下,可以轻松向层层套娃的子组件注入依赖,同时只对直系组件有影响,不会影响到旁系的组件。
具体实现
以下是 useIoC 的具体实现:
import { v4 as uuidv4 } from 'uuid';
// 组件的构造函数定义
export type Func = (args: I) => O
// IoC容器的接口定义
export interface Container {
    /**
     * 将组件注册到IoC容器中
     * @param key 组件ID
     * @param val 组件构造函数
     */
    register(key: string, val: any): void
    /**
     * 从IoC容器获取组件的构造函数
     * @param key 组件ID
     */
    get(key: string): T
}
// IoC容器的具体实现
function IoCContainer(): Container {
    let storage = new Map()
    return {
        register: function(key, val) {
            storage.set(key, val)
        },
        get: function(key: string): T {
            return storage.get(key)
        }
    }
}
// IoC容器的上下文接口定义
export interface Context {
    /**
     * 定义组件:将组件注册到IoC容器,如果参数subType不为空就组件的原始构造函数替换为subType
     * @param component 组件:原型链必须存在componentId
     * @param subType 组件构造函数的子类型,可以为空
     */
    define(component: Func, subType?: Func): Func
    /**
     * 从IoC容器中,根据componentId获取原始构造函数
     * @param component 组件:原型链必须存在componentId
     * @param props 父组件传递过来的IoC容器上下文
     */
    inject(component: Func, props?: any): Func
}
/**
 * 包装组件的构造函数
 * @param originFunction 组件的原生构造函数
 * @param container 组件的IoC容器上下文
 * @returns 返回包装函数
 */
function wrap(originFunction: Func, container: Container): Func {
    const wrapped = function (props: I) {
        // 将当前组件的IoC容器上下文加入到组件参数中,传递给子组件
        const newProps = {ioCContainer: container, ...props}
        return originFunction(newProps)
    }
    // 由于typescript编译到js过程中会丢失类型信息,这里使用唯一的uuid代替原本的类型信息
    wrapped.prototype.componentId = uuidv4()
    // 原型链增加originFunction字段指向原始构造函数
    wrapped.prototype.originFunction = originFunction
    return wrapped
}
// IoC容器上下文的具体实现
function IoCContext(): Context {
    const container = IoCContainer()
    return {
        define: function(component: Func, subType?: Func): Func {
            const originFunction = subType ?? component
            if (subType) {
                // 如果参数subType不为空就将IoC容器中的componentId对应的原始构造函数替换为subType
                const componentId = component.prototype.componentId
                componentId && container.register(componentId, originFunction)
            }
            return wrap(originFunction, container)
        },
        inject: function(component: Func, props?: any): Func {
            const componentId = component.prototype.componentId
            if (componentId) {
                // 如果父级组件传递过来的参数中包含了IoC容器,就直接从父级IoC容器中获取组件的构造函数
                if (props && props.ioCContainer) {
                    const iocContainer: Container = props.ioCContainer
                    const originFunction: Func = iocContainer.get(componentId)
                    if (originFunction) {
                        return wrap(originFunction, container)
                    }
                }
                // 如果父级IoC容器为空,或者不存在componentId对应的构造函数,则尝试在当前的IoC容器中获取
                let originFunction: Func = container.get(componentId)
                if (!originFunction) {
                    // 如果父级或当前IoC容器找不到componentId对应的构造函数,则直接返回原型链上的originFunction
                    originFunction = component.prototype.originFunction ?? component
                }
                return wrap(originFunction, container)
            }
            // 如果componentId为空,就直接返回component
            return component
        }
    }
}
// 每次调用都会产生一个新的IoCContext实例,
// 通过define函数将组件注册到IoCContext
// 然后再通过inject函数将注册的组件注入到其他组件中
export const useIoC = function(): Context {
    return IoCContext()
}
以上的代码实现,只引用一个第三方依赖:uuid,之所以不用React.useId(),目的是为了减少迁移到 Vue 等其他框架的成本,理论上只需要修改 Func 的定义即可。
简单例子
先定义一个 Button 组件:
import { FC, ReactNode } from "react"
import {useIoC} from "Com/app/hooks/ioc"

const {define, inject} = useIoC()

export const ButtonChildren: FC<{label: string}> = define((props: {label: string})  => {
    return (<span>{props.label}</span>)
})

type ButtonType = "primary" | "second" | "grey"

type ButtonProps = {
    onClick?: () => void
    type?: ButtonType
    children?: ReactNode
}

export const Button: FC<ButtonProps> = define(function(props) {
    const child = inject(ButtonChildren, props);
    return (
        <a className={`${props.type ?? "primary"} button`} onClick={(e: any) => props.onClick && props.onClick()}>
            {props.children || child({label: "Click Me!"})}
        </a>
    );
})
然后定义一个 IconButton ,注入带有 Icon 的 children ,如下所示:
import { useIoC } from "Com/app/hooks/ioc"
import { Button, ButtonChildren } from "./button"
import { FC } from "react"

const {define, inject} = useIoC()

export const IconButtonChild = define(ButtonChildren, () => <span><i>🎨</i>图标按钮</span>)

export const IconButton: FC<{onClick?: () => void}> = define((props) => {
    const button = inject(Button, props)
    return <>{button(props)}</>
})
最后,编写一个页面:
"use client";
import { Button } from "./components/basic/button";
import { IconButton } from "./components/basic/iconButton";
export default function Home() {
return (
<div>
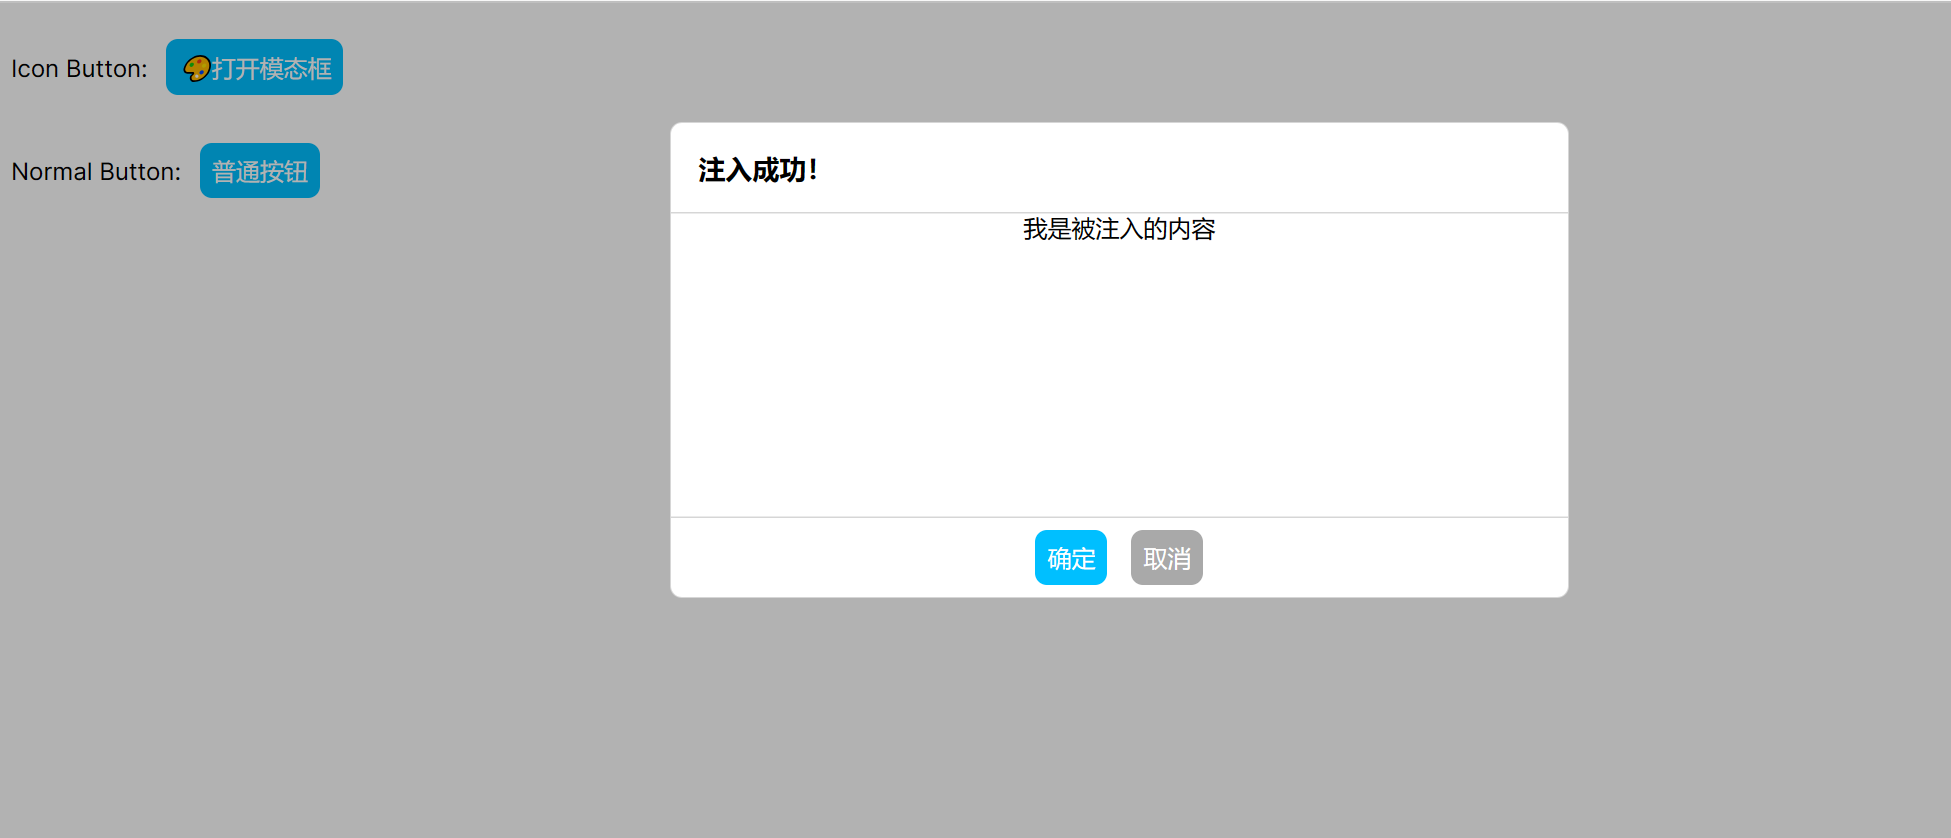
<p>Icon Button: <IconButton></IconButton></p>
<p>Normal Button: <Button>普通按钮</Button></p>
</div>
);
}
显示效果:
![]()
即便 IconButton 组件内部也引用 Button 组件,但由于 普通按钮 和 打开模态框 在组件树上是旁系不是直系,所以没有相互影响,这就是和传统的 Spring 依赖注入最大的不同之一!
复杂例子
如果到了这里,你还是觉得通过 useIoC 依赖注入子组件,并没有比通过 children 传递子组件更优雅,那就来个更复杂的例子,比如实现一个 Modal 组件:
import { useIoC } from "Com/app/hooks/ioc";
import { FC } from "react";
import { Button } from "../basic/button";

const {define, inject} = useIoC()

export const Header: FC<{title: string}> = define((props) => {
    return (
        <h3>{props.title}</h3>
    )
})

export const Body: FC = define(() => {
    return (<></>)
})

export const Footer: FC<{confirm: string, cancel: string}> = define((props) => {
    return (<div className="two buttons">
            <Button type="primary">{props.confirm}</Button>
            <Button type="grey">{props.cancel}</Button>
        </div>)
})

export const Modal: FC = define((props) => {
    const header = inject(Header, props)
    const body = inject(Body, props)
    const footer = inject(Footer, props)
    return <div className="dimmer">
        <div className="modal">
            <div className="header">{header({title: ""})}</div>
            <div className="body">{body({})}</div>
            <div className="center footer">{footer({confirm: "Confirm", cancel: "Cancel"})}</div>
        </div>
    </div>
})
"use client";

import { FC, useState } from "react";
import { Button } from "./components/basic/button";
import { IconButton } from "./components/basic/iconButton";
import { Body, Footer, Header, Modal } from "./components/modal/modal";
import { useIoC } from "./hooks/ioc";

const {define, inject} = useIoC()

define(Header, () => <p className="title">注入成功!</p>)

define(Body, () => <div>我是被注入的内容</div>)

const CustomFooter: FC<{onConfirm: () => void, onCancel: () => void}> = (props) => {
    return (<div className="two buttons">
        <a className="primary button" onClick={props.onConfirm}>确定</a>
        <a className="grey button" onClick={props.onCancel}>取消</a>
    </div>);
  }

export default function Home() {
  const [visible, toggleVisible] = useState(false)
  const [open, close] = [() => toggleVisible(true), ()=>toggleVisible(false), ]
  define(Footer, () => <CustomFooter onConfirm={close} onCancel={close}></CustomFooter>)
  const modal = inject(Modal)

  return (
    <div>
      <p>Icon Button: <IconButton onClick={open}></IconButton></p>
      <p>Normal Button: <Button>普通按钮</Button></p>
      { visible && modal({}) }
    </div>
  );
}
通过依赖注入,可以把大量无关的内容放到方法体以外,做到 关注点分离 ,代码可读性答大幅提升。
显示效果:
像 Modal 和 Tab 等组件往往需要多个children,这时候React是无能为力的,即便像 Vue 、Qwik 等框架选择 Web Component 规范的 Named Slot 勉强解决上述问题,但 Named Slot 还存在 不支持类型检查 和 个数有限 两个已知问题。
以 Tab 为例,除了 TabHead 一个 Named Slot 以外,还有无限个的 TabContent Slot,再说如果要实现 TabContent 内部一个按钮被点击后关闭当前Tab,用Slot实现起来非常麻烦,跟优雅完全不沾边。
分离视图和逻辑控制
在写 useIoC 之前,我用过不少开源的第三方封装UI库,比如 Element UI 、Ant Design 和 Materi UI ,它们提供的组件使用起来都不顺手。
下面就用 Notification 组件,来展示一下理想中的UI库组件:
import { useIoC } from "Com/app/hooks/ioc";
import { FC, ReactNode, useEffect, useState } from "react";

const {define, inject} = useIoC()

export interface Notifier {
    info(msg: string, timeout?: number): void
    warn(msg: string, timeout?: number): void
    error(msg: string, timeout?: number): void
}

export type MsgType = "info" | "warn" | "error";
export type Msg = {
    type: MsgType,
    text: string
    expiredAt: number
}

function newMsg(type: MsgType, msg: string, timeout = 1000): Msg {
    const now = new Date().getTime()
    return {type: type, text: msg, expiredAt: now + timeout}
}

export const Notification: FC<{msgs: Msg[], remove: (id: number) => void}> = define((props) => {
    return <ul className="notification">
        {
            props.msgs.map(msg => (
                <li key={msg.expiredAt} className={`${msg.type} item`}>
                    <span>{msg.text}</span>
                    <a className="icon" onClick={() => props.remove(msg.expiredAt)}>x</a>
                </li>
            ))
        }
    </ul>
})

export const useNotification: (props?: any) => [ReactNode, Notifier] = (props: any) => {
    const notification = inject(Notification, props)
    const [msgs, list] = useState(new Array<Msg>())
    useEffect(() => {
        const interval =setInterval(() => {
            const now = new Date().getTime()
            list(old => old.filter(msg => msg.expiredAt > now))
        }, 1000)
        return () => clearInterval(interval)
    }, [])

    const remove = function(id: number) {
        list(old => old.filter(msg => msg.expiredAt != id))
    }

    const notifier: Notifier = {
        info: function(msg: string, timeout = 5000) {
            list((old)=> [...old, newMsg("info", msg, timeout)])
        },
        warn: function(msg: string, timeout = 5000) {
            list((old)=> [...old, newMsg("warn", msg, timeout)])
        },
        error: function(msg: string, timeout = 5000) {
            list((old)=> [...old, newMsg("error", msg, timeout)])
        }
    }
    return [notification({msgs: msgs, remove: remove}), notifier]
}
使用:
"use client";

import { Button } from "./components/basic/button";
import { useNotification } from "./components/notification";

export default function Home() {
  const [notification, notifier] = useNotification()
  return (
      <Button onClick={() => notifier.info("info")}>通知</Button>
      <Button onClick={() => notifier.warn("warn")}>警告</Button>
      <Button onClick={() => notifier.error("error")}>错误</Button>
      {notification}
  );
}
这里,我把视图 notification 和 逻辑控制 notifier 分开,真正做到 高内聚、低耦合 。
我知道前端常见的做法是使用 zustand 这类状态管理框架,通过 dispatchEvent 方式来实现,但对于我来说,多少有点本末倒置了。
同样的,之前的 Modal 也应该有个 useModal 的hook:
"use client";

import { Button } from "./components/basic/button";
import { useModal } from "./components/modal";

export default function Home() {
  const [dimmer, modal] = useModal()
  modal.onConfirm(() => console.log("确定"))
  modal.onCancel(() => console.log("取消"))
  return (<div>
    <Button onClick={()=>modal.open()}>打开</Button>
    {dimmer}
  </div>);
}
除此之外,还应该有 useTab 、 useTable 、useMenu 等hook,复杂组件应该把视图和逻辑控制分开,而不是通过 visible && modal({}) 这样方式进行控制。
总结
之所以写这篇文章,主要原因是之前和别人吹牛,说要把设计模式带到前端,网友都嘲笑我 talk is cheap, show me the code 。
尽管我在公司的代码已经能体现我的思路,但保密协议限制我不能把它放到网上给大家看,而且为了写出的代码和文章容易看懂,我经常需要强迫自己进入 沙雕兼容 模式,否则在别人眼中,我就成了孔乙己。
useIoC答疑
距离上次发表 useIoC:仅一百多行代码实现前端的依赖注入 已经过去一个多月,期间网友和我进行多次深入且友好的互动。网友给我提了不少疑问和建议,我经过一个多月的思考和实践,决定将这些疑问和建议分享给大家。
1. 为什么不能照搬Angular的依赖注入?
Angular依赖注入的对象是实例,并且要求必须提供无参数的构造函数。
这个要求和 React 对 Function Component 的定义产生非常严重冲突:
type FC<P = {}> = FunctionComponent<P>;

interface FunctionComponent<P = {}> {
    (props: P, context?: any): ReactNode;
    propTypes?: WeakValidationMap<p> | undefined;
    contextTypes?: ValidationMap<any> | undefined;
    defaultProps?: Partial<any> | undefined;
    displayName?: string | undefined;
}
强行照搬Angular的依赖注入,需要对现有代码进行重构,把入参全部去掉或改成可选,这显然不符合实际。
其次,稍微具有亿点观察力的人,很容易发现 React 规定所有函数组件返回值必须是 ReactNode 。
而 ReactNode 的定义更是万金油,地位相当于 Java 的 Object 和 Go 的 interface{} 。
type ReactNode =
        | ReactElement
        | string
        | number
        | Iterable<ReactNode>
        | ReactPortal
        | boolean
        | null
        | undefined
        | DO_NOT_USE_OR_YOU_WILL_BE_FIRED_EXPERIMENTAL_REACT_NODES[keyof DO_NOT_USE_OR_YOU_WILL_BE_FIRED_EXPERIMENTAL_REACT_NODES];
想象一下,注入的实例类型都是 ReactNode ,原来是想注入一个Input,结果注入的是Button。 当你无法限制具体的注入变量的类型时,强行使用依赖注入只会产生更严重的后果!
2. 为什么依赖注入不直接使用React Context,反而要重新造轮子?
简短地说,就是React Context并不好用,因为每个组件注入的依赖类型和数量都不相同,相当于每个组件都需要重新定义一个Context,操作起来非常麻烦。
但可以基于 React Context 实现一个 IoCContext :
// 通过React useContext在组件树传递ioc context
export const IoCContext = createContext<Context>(NewIoCContext())

// 从父级组件中获取ioc context
export const useIoC = function(): Context {
    return useContext(IoCContext)
}
再经过 IoCContext 进行依赖注入,就不需要每个组件都创建新的 Context:
import { NewIoCContext, useIoC } from 'Com/app/hooks/ioc';
import { FC, ReactNode, useId } from 'react';
import { FormPropsDispatcher, InputType, NewFormController } from "./components/form/form";

const {define} = NewIoCContext()

export type LabelProps = {
    label: ReactNode
    for?: string
    children?: ReactNode
}

export const GetLabelID = define(() => "")

export const Label: FC<LabelProps> = define((props) => {
    const context = useIoC()
    const id = useId()
    context.define(GetLabelID, () => id)

    return <>;
        <label htmlFor={id}>{props.label}</label>
        {props.children}
    </>
})

export type InputProps = {
    name: string
    value?: InputType
    type?: string
    placeholder?: string
    readonly?: boolean
    onChange?: (val: InputType) => void
    onBlur?: (e: any) => void
    validate?: (val: InputType) => string
}

function transformValue(val: InputType)  {
    if (val instanceof File) {
        return undefined
    }
    return val
}

export const Input: FC<InputProps> = define((props) => {
    const context = useIoC()
    const labelId = context.inject(GetLabelID)({})

    return <input id={labelId} name={props.name} type={props.type} value={transformValue(props.value)} onblur={props.onBlur} placeholder={props.placeholder} readonly={props.readonly}/>
})
原来的
useIoC被重命名为NewIoCContext,原因是 React 规定所有自定义hook都必须以useXXX的方式命名,而 hook 只能在组件内部调用,但实际情况却是NewIoCContext并没有使用 React 官方的hook,所以只能改名 ;而新的useIoC由于内部调用useContext是货真价实的hook,但只能在组件内部被调用。
上述代码,主要是 Label 和 Input 两个组件,HTML5 规范要求 label 和 input 需要通过 id 绑定,所以 Label 足迹通过 useId 生成 id,然后通过 GetLabelID 注入 Input 组件中。
本来一切正常,但几乎所有的依赖注入工具都似乎建立在 单例模式 假设下,一旦遇到 单例模式 以外的场景就行不通,这其实也是为什么 Angular 早就支持依赖注入,但迟迟没能推广开来的原因之一。
以下面代码为例:
<Form action="">
    <Label label="用户名">
        <Input name="username" value="admin">
    </Label>
    <Label label="旧密码">
        <Input name="oldPWD" type="password" validate="{checkPassword}">
    </Label>
    <Label label="新密码">
        <Input name="newPWD" type="password" validate="{checkPassword}">
    </Label>
    <Label label="重复密码">
        <Input name="repeat" type="password" validate="{checkPassword}">
    </Label>
</Form>
上述代码,一共出现四次 Label 组件,意味着注入四个不同 GetLabelID 函数,然而 React Fiber 并发可能使得四个组件更新的顺序不一样,也就有可能导致 Input 组件被注入的依赖是随机,从而引发一系列的问题。
有位网友建议给每个组件都套上一层 IoCContext.Provider :
export const Label: FC<LabelProps> = define((props) => {
    const parent = useIoC()
    const context = NewIoCContext(parent)
    const id = useId()
    context.define(GetLabelID, () => id)

    return <>
        <Label htmlFor={id}>{props.label}</Label>
        <IoCContext.Provider value="{context}">
            {props.children}
        </IoCContext.Provider>
    </>
})
这样的做法是暂时解决问题,但并不是所有的场景都需要套上一层额外的 Provider。 尽管在数据量少的时候可以手动套上,避免所有场景都套上的尴尬情形; 但在数据量大的场景,比如说某个列表需要渲染上万个子项,手动套就非常麻烦,而且成为性能瓶颈。
对children属性的深入挖掘
熟悉 Angular 或 Vue 的开发者都知道有个 template 标签非常好用。
其实 React 也能实现类似的功能,函数式组件有一个很特别的属性 children 。
一般情况下,习惯把 children 的类型设置为 ReactNode ,这样就可以接受任意组件作为子组件,功能类似于 Vue 的静态 template,缺点是没办法向子组件传递参数。
后面发现改成 Function Component ,也就是 FC ,就可以传递参数给子组件,起到类似于 Vue 的 scoped template 的作用:
export type LabelProps = {
    label: ReactNode
    children: FC<{id: string}>
}

export const Label: FC<LabelProps> = define((props) => {
    const id = useId()
    return <>
        <label htmlFor={id}>{props.label}</label>
        {
            props.children({id})
        }
    </>
})
父级组件 Label 通过闭包的方式向子组件 Input 传递参数 id :
<Form action="">
    <Label label="用户名">
        {({id}) => <Input id={id} name="username" value="admin">}
    </Label>
    <Label label="旧密码">
        {({id}) => <input id={id} name="oldPWD" type="password" validate={checkPassword}>}
    </Label>
    <Label label="新密码">
        {({id}) => <Input id={id} name="newPWD" type="password" validate={checkPassword}>}
    </Label>
    <Label label="重复密码">
        {({id}) => <Input id={id} name="repeat" type="password" validate={checkPassword}>}
    </label>
</Form>
这种方式,可以很好地解决 React Context 在 非单例模式 场景下,父级组件向子组件传递参数的问题。
React 官方对于 children 的相关使用一直非常模糊,以至于在开发过程中,经常受到编译器的错误信息误导;
别看现在的代码看起来很直观,但第一把就能写对的可能性很低,主要原因还是官方并没有考虑挖掘一下 children 的潜力。
大多数人一开始能写出来的代码:
<Label label="用户名">
    <Input id={id} name="username" value="admin">
</Label>
然后编译报错提示:变量 id 没有定义,然后只能把 id 提取出来:
const id = useId()
const field = <Label id={id} label="用户名">
    <Input id={id} name="username" value="admin">
</Label>
但是这样的写法违反 迪米特里原则 ,显然 id 只在 Label 和 Input 之间传递,但却暴露给更多的组件。
假如需要在同一个地方写很多 Label 和 Input ,那还得给 id 取别名才能避免相互干扰。
异构children
有不少的组件,需要传递不同的children,但一个组件的只有一个 children 属性。
像 Vue 就提供了 named slot 的解决方案,但 React 没有,所以很多 React based 的UI库就经常这样写:
以标签页 Tab 为例,需要同时传递 TabHeader 和 TabContent ,并且还要求两者的长度和顺序都完全一致:
<Tabs>
  <TabList>
    <Tab>One</tab>
    <Tab>Two</tab>
    <Tab>Three</tab>
  </Tablist>

  <TabPanels>
    <TabPanel>
      <p>one!</p>
    </TabPanel>
    <TabPanel>
      <p>two!</p>
    </TabPanel>
    <TabPanel>
      <p>three!</p>
    </TabPanel>
  </TabPanels>
</Tabs>
以上是 Chakra UI 的示例代码,这样写法不利于后续的维护,尤其是数据逐渐增加后,经常会出现忘记添加 TabHeader 或 TabContent 导致长度不一致,某个页签只有标题没有内容,又或者是有内容但标签为孔;而且必须要保证顺序是正确的,否则会出现标签和内容不一致的尴尬场面!
面对这种问题,常见的解决方法,把数据提取到一个数组,然后通过数组的 map 函数一同映射。
可惜,这样的做法又像前面的例子一样违反 迪米特里原则 。
以下是我的做法:
<Tab activeTab="abc">
    <TabItem title="abc">123</TabItem>
    <TabItem title="def">456</TabItem>
    <TabItem title="ghi">789</TabItem>
</Tab>
title 是页签的标题,children 是页签的内容,TabItem 完整代码如下:
export type TabItemProps = {
    title: string,
    closeable?: boolean,
    children: ReactNode
}

export const TabItem: FC<TabItemProps> = define((tab) => {
    const context = useIoC()
    const setTab = context.inject(TabPropsDispatcher)
    useEffect(() => {
        setTab(p => {
            if (p.tabs) {
                if (p.tabs.find(t => t.title == title)) {
                    return p
                }
                return {...p, tabs: [...p.tabs, tab], activeTab: p.activeTab ?? title}
            }
            return {...p, tabs: [tab]}
        })
  })
    return <></>;
})
TabPropsDispatcher 是父组件 Tab 定义的,就是 const [props, setProps] = useState() 的 setProps。
第一步是 Tab 组件定义 TabPropsDispatcher 注入到 TabItem ,
然后 TabItem 通过依赖注入获得 TabPropsDispatcher ,
最后把当前页签的标题 title 和内容 content 注册到父级组件。
最后一步,要求
title必须是唯一的,注册到父组件那一步出现 在组件渲染的过程中使用hook修改属性 ,按照 React 官方的说法,这么做是会导致无限循环,所以注册到父组件的函数会判断一下title是否已存在,如果已存在就停止修改属性,从而避免渲染陷入无限循环。
为了解决报错,注册组件必须被包裹在 useEffect 中运行,否则 React 会直接报错。
只有向父组件注册子组件的信息,Tab 组件才能正确的切换或关闭页签。
如果需要自定义标签页的样式,可以通过 define(TabHeader, () => <自定义标签头>) ,向 Tab 组件注入自定义的组件
更复杂的例子
表格组件 Table 是前端 UI 不可或缺的重要组件, 不少 React based 的 UI 库例如 antd 在封装 Table 组件的时候,由于不能使用 named slot 等原因,封装出来的 Table 组件在使用的过程中稍显啰嗦,头重脚轻:
const dataSource = [
  {
    key: '1',
    name: '胡彦斌',
    age: 32,
    address: '西湖区湖底公园1号',
  },
  {
    key: '2',
    name: '胡彦祖',
    age: 42,
    address: '西湖区湖底公园1号',
  },
];

const columns = [
  {
    title: '姓名',
    dataIndex: 'name',
    key: 'name',
  },
  {
    title: '年龄',
    dataIndex: 'age',
    key: 'age',
  },
  {
    title: '住址',
    dataIndex: 'address',
    key: 'address',
  },
];

;
<Table dataSource="{dataSource}" columns="{columns}"></Table>
下面通过把 children 类型改成 FC<{name: string, rowNum: number, data: any}> ,就可以让代码简洁不少:
<Table data="{[]}">
    <TableColumn name="id" title="编号" width="{10}">
        {({data}) => <input type="checkbox" name="ids" value={data.id}>}
    </TableColumn>
    <TableColumn name="name" title="名字" width="{40}">
        {({data}) => data.name}
    </TableColumn>
    <TableColumn name="age" title="年龄" width="{20}">
        {({data}) => data.age}
    </TableColumn>
    <TableColumn name="operation" title="操作" width="{20}">
        {
            ({rowNum}) => {
                const setTable = inject(TablePropsDispatcher)
                const ctl =NewTableController(setTable)
                return <button type="danger" onclick={()=> ctl.removeData(rowNum)}>删除</button>
            }
        }
    </TableColumn>
</Table>
TableColumn组件的title类型是ReactNode,这意味着你可以使用任何组件定制表格头。
基于 Vue 的 element-ui 也有类似的写法,可以点击 组件 | Element 。
小结
通过将 children 类型改成 FC 的方式模拟 Vue 的 named slot ,不失为弥补 React Context 不足之处的有效手段。
我个人比较倾向于这样写前端代码:
<ParentComponent>
  {
      // 向子组件传递参数,不需要对外暴露任何内部属性,功能更内聚
      (props) => <ChildComponent>{props.fromParent}</ChildComponent>
  }
  {
      // 返回空的子组件,做一些带有副作用的操作:从远端服务获取数据
      (props) => {
          useEffect(() => accessRemoteServer(props))
          return <></>
      }
  }
</ParentComponent>
这样的代码看起来更直观易懂,因为所有与 ParentComponent 相关的代码都在 ParentComponent 组件内部,没有对外暴露任何的内部属性,使得组件的功能更加内聚,提供代码的健壮性。
总结
useIoC 和 IoCContext 是基于 React Context 的依赖注入工具,它克服了 React Context 需要针对每个组件的不同属性新增 Context 的缺点,使得各组件之间的耦合关系进一步降低,提高组件的可扩展性。
促使前端 UI 库或框架的代码水平更进一步,诸如 SOLID 等常见编码规范、编程模式,也能在前端落地。
而对 children: FC 的改造,使得功能模块更加内聚,与 useIoC 相互配合,就可以编写出 高内聚 、低耦合 的代码。
适用范围比较
useIoC 的优点是灵活,可以注入任意数量和类型的依赖,不破坏组件的函数签名,适合嵌套层次比较深的组件
useIoC 的缺点源自于 React Context ,定义的依赖默认是全局只有一个实例,在多实例的情况需要增加 IoCContext.Provider 才能避免相互干扰,在数据量比较大的情况下容易出现性能瓶颈。
children: FC 的优点是简单可靠且容易维护,默认并发安全,性能开销少。
children: FC 的缺点是扩展性差,能传递的参数类型和数量比较固定,想增加/修改属性会破坏函数签名
掌握 useIoC 和 children: FC 两种父组件向子组件传递参数的方式,并根据两者的适用范围灵活运用,就可以写出高质量的前端代码。
完整的源代码在这里zaoying/uikit (github.com)
useI18n——基于依赖注入实现国际化功能
前情提要
一个月前,我基于React hook 实现前端组件的依赖注入,前文:useIoC:仅一百多行代码实现前端的依赖注入。
同时也尝试基于依赖注入实现一套UI库,目的是验证前端依赖注入的可行性,然后意外解锁 React children 的全新用法:useIoC答疑 & 对children属性的深入挖掘。
UI库已在Github开源:https://github.com/zaoying/uikit
在造轮子的过程中,经过不断尝试又找到一些前有未见的最佳实践,还封装一些好用的工具。
下面逐个分享给大家
国际化:useI18n
业务经常会遇到页面支持国际化的需求,然而组内对于国际化功能的实现却非常简单粗暴,直接在 assets 目录新建 i18n 目录,然后新增 zh-cn.json 或 en-us.json ,然后往里面写对应的中文、英文,如下:
{
    "modal": {
        "confirm": "Confirm",
        "cancel": "Cancel"
    }
}
这样的做法一开始没啥问题,可随着页面的不断增加,渐渐地文件越来越大,有些翻译太长自动换行后就严重影响可读性。
除此之外,还会经常遇到忘记翻译的尴尬情形;或者是文件太长,想找到对应的翻译十分困难。
更令人反感的是,使用时还需要把 json 文件转换成 Object 对象,然后在使用 TranslateService 翻译一遍,这样的做法实在是过于鸡肋和繁琐。
我在外网以 react i18n 搜索一番,发现有个比较受欢迎的项目 react-i18next,官方的代码演示如下:
<div>{t('simpleContent')}</div>
<Trans i18nKey="userMessagesUnread" count={count}>
  Hello <strong title={t('nameTitle')}>{{name}}</strong>, you have {{count}} unread message(s). <Link to="/msgs">Go to messages</Link>.
</Trans>
呃。。。说实话,这个项目的做法和组内大差不差,水平都是半斤八两。
作为一个七年经验的开发,背过的八股文数不胜数,我很自然就想到通过依赖注入的方式实现国际化功能,并且理所当然地认为业界应该有很多的优秀实践,然后现实却狠狠地打我的脸。
为什么现在前端连个优雅的国际化工具都找不到?
难道那些在面试的时候,靠八股文为难别人的“高手”,估计也是死记硬背、滥竽充数的水货,目的仅仅就是为了PUA老实人?
吐槽完毕,回到正题,我的解决思路是根据不同 locale 分别创建独立的 context ,然后通过 navigator.locales 获取对应的 context 。
首先,先定义一个词条 ModalDict ,并且指定 locale 为 en-us:
export const ModalDict = i18n("en-us", () => {
    return {
        confirm: "Confirm",
        cancel: "Cancel"
    }
})
接着通过 register 函数,给特定的 locale 注册翻译:
register("zh-cn", (locale) => {
    locale.define(ModalDict, () => ({
        confirm: "确定", cancel: "取消"
    }))
})
最后通过 useI18n 注入到组件中,通过 dict.key 的方式访问属性有语法提示,可以有效渐少通过 translate(key) 传入字符串时因为拼写错误而导致翻译失败的尴尬场面,更符合人体工程学。
export type FooterProps = {
    confirm?: ReactNode
    cancel?: ReactNode
    onConfirm?: () => boolean,
    onCancel?: () => boolean
}

export const Footer: FC<FooterProps> = (props) => {

    const dict = useI18n(ModalDict)({})

    return <div className="two buttons">
        <Button type="primary" onClick={props.onConfirm}>
            {dict.confirm}
        </Button>
        <Button type="grey" onClick={props.onCancel}>
            {dict.cancel}
        </Button>
    </div>
}
细心的你可能注意到,ModalDict 是个无参数的函数。为什么不直接用Object呢?
使用函数的优点是可以同时支持根据不同的 locale 注入不同的国际化组件,而不局限于文字信息。
举个例子,有个需求需要你根据不同地区输出不同的日期:大中华地区就按年月日输出,而欧美地区的就需要反过来,按照日月年的顺序输出;不仅“年”、“月”、“日”要被翻译成 "Year" / "Month" / "Day" ,而且顺序还刚好相反。
这种情况,如果还是逐字翻译,必然要写一大堆的 if else ,还不如直接根据 locale 注入不同的组件,代码实现起来更简洁易懂。
接下来,给大家看看 useI18n 的具体实现:
import { Context, Func, NewIoCContext } from "./ioc"

const GlobalDict = new Map<string, any>()

/**
 * 批量注册国际化组件
 * @param locale 地域
 * @param callback 用于注册组件的回调函数
 */
export function register(locale: string, callback: (locale: Context) => void) {
    const key = new Intl.Locale(locale).toString()
    const localizeCtx = GlobalDict.get(key) ?? NewIoCContext()
    callback(localizeCtx)
    GlobalDict.set(key, localizeCtx)
}

/**
 * 根据不同的地区获取组件的上下文
 * @param locale 地域
 * @returns 组件的上下文
 */
export function get(locale: Intl.Locale) {
    const key = locale.toString()
    return GlobalDict.get(key) ?? NewIoCContext()
}

/**
 * 注册单个国际化组件
 * @param locale 地域
 * @param component 组件
 * @returns 返回带有componentId的组件
 */
export function i18n<I, O>(locale: string, component: Func<I, O>): Func<I, O> {
    const canonical = new Intl.Locale(locale)
    const localizeCtx = get(canonical)
    return localizeCtx.define(component)
}

// 默认地域
let defaultLocale: Intl.Locale = new Intl.Locale("en-us")

/**
 * 初始化默认地域
 */
export function initLocale() {
    const locale = navigator.languages?.length ? navigator.languages[0] : navigator.language;
    defaultLocale = new Intl.Locale(locale)
}

/**
 * 手动设置默认地域
 * @param locale 地域
 */
export function setLocale(locale: string) {
    defaultLocale = new Intl.Locale(locale)
}

/**
 * 根据默认地区获取国际化组件
 * @param component 国际化组件
 * @returns 默认地区的国际化组件
 */
export function useI18n<I, O>(component: Func<I, O>): Func<I,O> {
    const localizeCtx = get(defaultLocale)
    return localizeCtx.inject(component)
}
算上注释总共才60多行代码,就能优雅地实现基本的国际化功能,这就是依赖注入的便利性。
组件之间共享状态:WithState
使用 React 搞前端开发,经常会遇到组件之间需要共享状态的场景,比如:填写地址时省份和地级市的联动、填写日期时年月日之间的联动等等,然后就参考 React 官方文档,将状态通过 useState 的方式将变量提升到父级组件。
一次偶然的机会,我在编写 Stepper 组件时,随便点点一个联动组件,结果 Stepper 组件意外重新渲染了,如果不是 Stepper 组件重新渲染数据超级加倍了,我甚至都没意识到这个问题。
export default function Home() {
    const [state, useState] = useState("bottom")
    return <div>
        <Tooltip message="普通按钮" direction={state}>
            <Button>普通按钮</Button>
        </Tooltip>
        <Dropdown trigger="click">
            <Button type="grey">请选择方向<i className="icon">﹀</i></Button>
            <a key="top" onClick={()=> setState("top")}>上</a>
            <a key="bottom"  onClick={()=> setState("bottom")}>下</a>
            <a key="left"  onClick={()=> setState("left")}>左</a>
            <a key="right"  onClick={()=> setState("right")}>右</a>
        </Dropdown>

        <Stepper></Stepper>
    </div>
}
从源码来看,联动组件跟 Stepper 组件之间毫无瓜葛,仅仅是因为两者在同一个父组件,然后联动组件修改state就会触发父级组件下所有的子组件全部刷新,这实在太离谱!
然后我就尝试把联动组件提取出来单独封装一个组件:ButtonAndDropdown ,看这冗长的名字就知道违背了单一原则。
然而当我尝试通过Closure闭包,把 useState 包裹起来时,却被React警告,不能在闭包内使用hook;因此我只能封装一个hook,然而还是没用,因为没有闭包无法限制state的作用域,闭包又不能使用hook。
我只能退而求其次,把自定义hook改造成一个组件,结果出乎意外的好:
<WithState state={"bottom" as Direction}>{
    ({state, setState}) => <>
        <Tooltip message="普通按钮" direction={state}>
            <Button>普通按钮</Button>
        </Tooltip>
        <Dropdown trigger="click">
            <Button type="grey">请选择方向<i className="icon">﹀</i></Button>
            <a key="top" onClick={()=> setState("top")}>上</a>
            <a key="bottom"  onClick={()=> setState("bottom")}>下</a>
            <a key="left"  onClick={()=> setState("left")}>左</a>
            <a key="right"  onClick={()=> setState("right")}>右</a>
        </Dropdown>
    </>
}</WithState>
无论是从代码实现,还是实际效果,看起来跟使用闭包毫无差别。关键是 WithState 组件的实现也很简单:
export type StateProps<S> = {
    state: S
    children: FC<{state: S, setState: Dispatch<SetStateAction<S>>}>
}

export function WithState<S>(props: StateProps<S>) {
    const [state, setState] = useState(props.state)
    return props.children({state, setState})
}
因此,我也学到一个技巧:当自定义hook不好使的时候,可以试试用组件包裹起来
简单一个 WithState 组件,却可以解决困扰许久的问题,可以将组件之间的状态包裹起来,避免影响到其他的组件。
我的个人看法:React 官方应该提供如此简洁有效的方案,而不是推行那种反模式的做法。
防止无限渲染:Once
在封装 Modal 组件的过程,发现设置 onConfirm 或 onCancel 回调时,总是会陷入无限循环的渲染
<Modal width={360} title="修改用户资料">{
    ({ctl, ctx}) => {
        ctl.onConfirm(() => {
            const setForm = ctx.inject(FormPropsDispatcher)
            const formCtl = NewFormController(setForm)
            const formRef = ctx.inject(FormReference)({})
            formCtl.validate(formRef);
            return true
        })
        return <Button onClick={ctl.open}>
            <span><i>🎨</i>打开模态框</span>
        </Button>
    }
}</Modal>
之前封装的组件也遇到类似的问题,但之前的组件是通过判断某个字段是否已存在。
如果该字段已经存在,就不修改任何 state ,从而阻断无限循环。
但这就要求 state 必须具备某个唯一的字段。
然而 Modal 组件的 onConfirm 和 onCancel 都是函数,连字段都没有。
所以我想到自定义一个hook:useOnce,然而还是遇到闭包不能使用hook的限制,所以我又把它改造成一个组件:
import { FC, ReactNode, useEffect, useState } from "react"

export type OnceProps = {
    children: FC
}

export function Once(props: OnceProps) {
    const [children, setChildren] = useState<ReactNode>()
    useEffect(() => {
        if (!children) setChildren(props.children({}))
    }, [children, props])
    return <>
        {children}
    </>
}
然后给 Modal 组件用上:
export const Modal: FC<ModalProps> = (old) => {
    const [props, setProps] = useState<ModalProps>(old)
    const context = useIoC()
    context.define(ModalPropsDispatcher, setProps)

    const className = props.className ?? "modal"
    return <>
        <Once>{
            () => props.children && props.children({
                ctx: context,
                ctl: NewModalController(setProps)
            })
        }</Once>
        <div className={`dimmer ${props.visible ? "show" : ""}`}>
        <div className={className} style={{width: props.width, height: props.height}}>
                <div className="header">{context.inject(Header)(props)}</div>
                <div className="body">
                    {context.inject(Body)(props)}
                </div>
                <div className="center footer">
                    {context.inject(Footer)(props)}
                </div>
        </div>
    </div>
    </>
}
套上 Once 组件后,效果确实如我所料,终于不会再陷入无限循环渲染。
在编写 Stepper 组件的时候,还是发现一些问题:虽然 Once 确实让当前组件只渲染一次。
但在某些特殊场景,子组件还是多次渲染,只不过不会陷入无限循环。
所以这就要子组件必须满足 幂等 ,简单来说就是不管执行多少次的结果,都第一次执行的结果一致。
以 Table 组件为例,无论重复调用 setData 多少次,结果都是一样的:
<Table data={new Array<{id: number, name: string, age: number}>()}>{
    ({ctl}) => {
        return <TableColumn name="id" title={<input type="checkbox" name="ids" value="*"/>} width={10}>
            {({data}) => {
                ctl.setData([
                    {id: 0, name: "张三", age: 35},
                    {id: 1, name: "李四", age: 28},
                    {id: 2, name: "王五", age: 40}
                ])
                return <input type="checkbox" name="ids" value={data.id}/>
            }
        </TableColumn>
    }
}</Table>
但调用 appendData 则不同,重复执行n次 appendData ,数据就是会重复n次。
Stepper 组件的子组件 StepperItem 就存在这样的问题,解决方法就是通过 useId 生成唯一ID去重。
对于没有唯一字段的情况 ,可以通过
useId生成唯一字段进行去重。
泛型化组件
在开发 Form 组件时,曾经想过给组件加上泛型,如此在使用的时候还能享受IDE的智能提示。
但是我很快发现 input 的 value 早就被限制得死死的:string | ReadonlyArray<string> | number | undefined 。
而且我也发现闭包形式的 function(){} 以及 箭头函数形式 () => {} 都不支持泛型。
要使用泛型,只能老老实实地回到常规的函数定义: function Xxx() {} 。
所以我就把 Table 组件改成最常见的函数定义:
export function TableColumn<T>(props: TableColumnProps<T>) {
    const context = useIoC()
    const setProps = context.inject(TablePropsDispatcher)
    const ctl = NewTableController<T>(setProps)
    useEffect(() => ctl.insert(props))
    return <></>
}

export function Table<T>(old: TableProps<T>) {
}
细心的网友可能会发现,Table 和 TableColumn 竟然不需要 define 函数包裹一层,那还能使用依赖注入吗?
答案就是丝毫不影响,因为我参考 React 官方对 FunctionComponent 的定义,重构 Func 的定义:
// 组件的构造函数定义
export interface Func<I, O> {
    (props: I, context?: Context): O;
    componentId?: string
    displayName?: string | undefined;
    originFunction?: Func<I, O>
}
这样做的好处有很多:
首先, React 在打印错误日志时能正确显示组件名称,而不是千篇一律的 wrapper ;
其次,所有的函数式组件都不需要通过 define 函数包裹,调用方可以直接通过 inject 进行依赖注入。
最后,被调用方还是通过 define(component, subType) 注入不同的子类型。
在使用的时候,泛型化的组件跟普通的组件几乎没有区别:
<Table data={new Array<{id: number, name: string, age: number}>()}>{
    ({ctl, Column}) => {
        ctl.setData(
            {id: 0, name: "张三", age: 35},
            {id: 1, name: "李四", age: 28},
            {id: 2, name: "王五", age: 40}
        )
        return <Column name="id" title={<input type="checkbox" name="ids" value="*"/>} width={10}>
            {({data}) => <input type="checkbox" name="ids" value={data.id}/>}
        </Column>
    }
</Table>
唯一需要注意的是,TableColumn 被改成 Column ,原因是 Table 父组件并不能把具体的泛型 T 穿给子组件 TableColumn 。
而且 TableColumn<T> 的 <T> 和 JSX/TSX 语法冲突,所以只能通过以下的方式:
export type TableArgs<T> = {
    ctx: Context
    ctl: TableController<T>
    Column: FC<TableColumnProps<T>>
}

export type TableProps<T> = {
    data: T[]
    children: FC<TableArgs<T>>
}

export function Table<T>(old: TableProps<T>) {
    const [props, setProps] = useState<TP<T>>({data: old.data, columns: []})
    const context = useIoC()
    context.define(TablePropsDispatcher, setProps)

    const tabHeader = context.inject(TableHeader<T>)
    const tabBody = context.inject(TableBody<T>)
    return <div className="table">
        <table>
            {tabHeader(props)}
            {tabBody(props)}
        </table>
        <div className="footer">
            <Once>{
                () => old.children({
                    ctx: context,
                    ctl: NewTableController<T>(setProps),
                    Column: TableColumn<T>
                })
            }</Once>
        </div>
    </div>
}
这里的
Column就等价于TableColumn<T>。
这种做法其实解锁一个前所未有的用法,既然可以通过闭包向子类型传递泛型 T ,自然也可以传递更多的依赖。
这种传递依赖的方式,比依赖注入更高效,而且直观易懂,并非没有对外暴露内部的属性。。
总结
- 通过依赖注入的方式来实现国际化功能特性,高效又优雅
- 将 useState 封装成 WithState 组件,可以优雅实现组件之间的共享状态
- 将 useEffect 封装成 Once 组件,可以确保 effect 只执行一次
- 子组件如果无法满足唯一性的要求,可以通过 useId 生成唯一ID
- 父级组件可以通过修改 children 的类型,向子组件传递包括但不限于泛型等信息或依赖
useResource:声明式API与useMock基于依赖注入的mock工具
前不久组内的萌新用不知道从哪里学来的技术,说要封装一套 axios 库供大家使用。
等他开发完,在 code review 环节,大家看到他写的代码都面面相觑,不知道该如何评价。
我一时间也不知道该如何评价,只能提醒他不要写死代码,目前 axios 还没入选开源库,后期有可能换成其他替代品。
会后我专门到网上搜一番,发现二次封装 axios 的案例确实不少,但给我感觉其实都半斤八两,不见得哪个更优秀。
当时我们刚从Java切换到Go,由于Go对于 swagger 支持不够好,前后端对接的接口文档需要手写。
有时候后端修改了接口没有通知前端,经常遇到相互扯皮的事情。
我突发奇想,既然Go对注解、装饰器的支持很不好,前端的 typescript 语法跟 Java 十分相似,为什么不把Java那套照搬到前端?
不仅能解决前端接口封装的问题,还能规避go不支持swagger文档的问题。
useResource:声明式API
说干就干,我参考 Open Feign 的设计,Feign 的设计很大程度上借鉴了 Spring MVC 。
只是 Feign 主要面向客户端,而 Spring MVC 面向服务端,两者的注解大同小异,Feign 兼容后者而已。
interface GitHub {
  @RequestLine("GET /repos/{owner}/{repo}/contributors")
  List<Contributor> contributors(@Param("owner") String owner, @Param("repo") String repo);

  @RequestLine("POST /repos/{owner}/{repo}/issues")
  void createIssue(Issue issue, @Param("owner") String owner, @Param("repo") String repo);
}
显然这种声明式API的设计,比那些二次封装 axios 的方案优雅太多了,真正做到抽象接口与具体实现分离。
声明式API可以不改动业务代码的前提下,根据实际情况把具体实现在原生 fetch 和 axios 之间切换。
装饰器
其实说照搬Java的说法是不正确的,Typescript 只有装饰器的说法,并没有注解。
而且两者差别还挺大的,Java是先定义注解Annotation,然后在运行时通过反射获得注解的元数据metadata;
然而装饰器 Decorator 的做法就非常直接白,直接一次性把所有的事情做完了。
export type Method = "GET" | "POST" | "PUT" | "PATCH" | "DELETE" | "OPTION"

export interface Exchange {
    (...args: any[]): Promise<Response>
}

export interface Operation {
    method?: Method
    path?: string
    headers?: Record<string, string>
    pathVariables: {name: string, order: number}[]
    requestBody?: {order: number, encode: (body: any) => BodyInit}
}

export interface Operations {
    [key: string]: Operation
}

export interface Resource {
    exchange: Exchange
    endpoint?: string
    resourceName?: string
    headers?: Record<string, string>
    operations?: Operations
}

export const RESTfulHeader: Record<string, string> = {
    "Content-Type": "application/json"
}

export function RESTful(endpoint: string, resource?: string, headers?: Record<string, string>) {
    return function<T extends { new (...args: any[]): Resource}>(target: T) {
        return class extends target {
            constructor(...args: any[]) {
                super(...args)
                this.endpoint = endpoint
                this.resourceName = resource
                this.headers = headers ? {...headers, ...RESTfulHeader} : {...RESTfulHeader}
            }
        }
    }
}

export function RequestMapping(method: Method, path: string, headers?: Record<string, string>) {
    return function(target: Resource, methodName: string, descriptor: PropertyDescriptor) {
        if (!target.operations) {
            target.operations = {}
        }
        const op = target.operations[methodName] ?? {pathVariables: []}
        op.method = method
        op.path = path
        op.headers = headers
        target.operations[methodName] = op
    }
}

export function Get(path: string, headers?: Record<string, string>) {
    return RequestMapping("GET", path, headers)
}

export function Post(path: string, headers?: Record<string, string>) {
    return RequestMapping("POST", path, headers)
}

export function Put(path: string, headers?: Record<string, string>) {
    return RequestMapping("PUT", path, headers)
}

export function Patch(path: string, headers?: Record<string, string>) {
    return RequestMapping("PATCH", path, headers)
}

export function Delete(path: string, headers?: Record<string, string>) {
    return RequestMapping("DELETE", path, headers)
}

export function Option(path: string, headers?: Record<string, string>) {
    return RequestMapping("OPTION", path, headers)
}

export function PathVariable(name: string) {
    return function(target: Resource, propertyKey: string | symbol, parameterIndex: number) {
        if (!target.operations) {
            target.operations = {}
        }
        const methodName = String(propertyKey)
        const op = target.operations[methodName] ?? {pathVariables: []}
        const pv = {name: name, order: parameterIndex}
        op.pathVariables.push(pv)
        target.operations[methodName] = op
    }
}

export const PV = PathVariable

export interface Encoder<T> {
    (src: T): BodyInit
}

export function RequestBody<T>(encoder: Encoder<T>) {
    return function(target: Resource, propertyKey: string | symbol, parameterIndex: number) {
        if (!target.operations) {
            target.operations = {}
        }
        const methodName = String(propertyKey)
        const op = target.operations[methodName] ?? {pathVariables: []}
        op.requestBody = {order: parameterIndex, encode: encoder}
        target.operations[methodName] = op
    }
}

export function JSONBody() {
    return RequestBody<Object>(JSON.stringify)
}

export function PlainBody() {
    return RequestBody<Object>(String)
}

export function FileBody() {
    return RequestBody<Blob>((src) => src)
}
然而我在实现的过程,还是坚持把这个过程给解耦了,装饰器只是单纯地把元数据保存到目标的 Resource 中。
useResource
接下来就是把保存在 Resource 的元数据读取出来,然后把 exchange 函数替换掉。
import { Delete, Exchange, Get, JSONBody, PV, Post, Put, RESTful, Resource } from "../annotations/restful"
import { useIoC } from "./ioc"

export interface Provider<T extends Resource> {
    (exchange: Exchange): T
}

export interface RequestInterceptor {
    (req: RequestInit): RequestInit
}

export interface ResponseInterceptor {
    (res: Response): Response
}

const globalRequestInterceptor: RequestInterceptor[] = []
const globalResponseInterceptor: ResponseInterceptor[] = []

export function addRequestInterceptor(interceptor: RequestInterceptor) {
    globalRequestInterceptor.push(interceptor)
}

export function addResponseInterceptor(interceptor: ResponseInterceptor) {
    globalResponseInterceptor.push(interceptor)
}

export function useResource<T extends Resource>(provider: (exchange: Exchange) => T): T {
    const context = useIoC()
    const exchange = context.inject(DefaultExchange)
    const sub = context.inject(provider)
    const resource = sub(exchange)
    invoke(resource, resource)
    return resource
}

function DefaultExchange(...args: any[]) {
    return Promise.resolve(new Response("{}"))
}

function invoke<T extends Resource>(resource: T, top: T) {
    const proto = Object.getPrototypeOf(resource)
    if (!proto) {
        return
    }
    invoke(proto, top)
    const props = Object.getOwnPropertyDescriptors(resource)
    for (const key in props) {
        const prop = props[key].value
        if (typeof prop == "function") {
            const exchange = sendRequest(key, resource, top)
            if (exchange) {
                const replace = prop.bind({...resource, exchange: exchange})
                const map = new Map([[key, replace]])
                Object.assign(resource, Object.fromEntries(map.entries()))
            }
        }
    }
}

function sendRequest<T>(methodName: string, res: Resource, top: Resource): Exchange | undefined {
    if (!res.operations) {
        return
    }
    const op = res.operations[methodName]
    if (!op) {
        return
    }
    const headers = top.headers ?? {}
    const opHeaders = op.headers ?? {}
    return async (...args: any[]) => {
        let path = op.path
        if (path && op.pathVariables) {
            for (const pv of op.pathVariables) {
                path = path.replace("{" + pv.name + "}", String(args[pv.order]))
            }
        }
        const url = `${top.endpoint}/${top.resourceName}/${path}`
        let request: RequestInit = {
            method: op.method,
            headers: {...headers, ...opHeaders}
        }
        if (op.requestBody) {
            const order = op.requestBody.order
            request.body = op.requestBody.encode(args[order])
        }
        try {
            for (const interceptor of globalRequestInterceptor) {
                request = interceptor(request)
            }
            let response = await fetch(url, request)
            for (const interceptor of globalResponseInterceptor) {
                response = interceptor(response)
            }
            return Promise.resolve(response)
        } catch (e) {
            return Promise.reject(e)
        }
    }
}
一时间看不懂所有代码实现也没关系,可以先看看怎么使用:
先编写一个实现增删改查的基类 CURD<T>,T 由子类决定,再继承基类编写 UserResource
import { Delete, Exchange, Get, JSONBody, PV, Post, Put, RESTful, Resource } from "../annotations/restful"

@RESTful("example.com", "resource")
export class CURD<T> implements Resource {
    exchange: Exchange
    constructor(exchange: Exchange) {
        this.exchange = exchange
    }

    @Get("?page={page}&pageSize={pageSize}")
    async list(@PV("page") page?: number, @PV("pageSize") pageSize?: number): Promise<T[]> {
        return (await this.exchange(page ?? 1, pageSize ?? 10)).json()
    }

    @Post("")
    async create(@JSONBody() t: T): Promise<Response> {
        return this.exchange(t)
    }

    @Get("{id}")
    async get(@PV("id") id: string): Promise<T> {
        return (await this.exchange(id)).json()
    }

    @Put("{id}")
    async update(@PV("id") id: string, @JSONBody() t: T): Promise<Response> {
        return this.exchange(id, t)
    }

    @Delete("{id}")
    async delete(@PV("id") id: string): Promise<Response> {
        return this.exchange(id)
    }
}

export interface User {
    username: string
    password: string
    role: string[]
}

@RESTful("localhost", "users")
export class UserResource extends CURD<User> {
}

export function UserResourceProvider(exchange: Exchange): UserResource {
    return new UserResource(exchange)
}
接着,通过注入 UserResourceProvider 获得 UserResource 的实例,最后通过实例方法调用后端的接口:
const userRes = useResource(UserResourceProvider)
userRes.list().then(console.info)
const user = {username: "", password: "", role: []}
userRes.get('1').then(console.info)
userRes.create(user).then(console.info)
userRes.update('1', user).then(console.info)
userRes.delete('1').then(console.info)
拦截器
给每个request设置token
addRequestInterceptor((req) => {
    const authToken = {}
    if (req.headers) {
        const headers = new Headers()
        headers.append("Authorization", "bear:xxxxx")
        if (req.headers instanceof Array) {
            for (const h of req.headers) {
                headers.append(h[0], h[1])
            }
        }
        req.headers = headers
    }
    req.headers = authToken
    return req
})
useMock:基于依赖注入的mock工具
组内的成员都是搞前端开发的新手,不知道如何 mock 后端接口。
我想起以前从没有为这件事情发过愁,原因是后端接口都接入 swagger/openapi ,可以直接生成mock server。
只是后端切换到Go以后,他们不知道该如何接入 swagger ,只能每个人都在本地维护一套 mock server。
关键是他们都担心 mock 代码会影响到生产环境,所以都没有提交代码仓库。 结果遇到某个问题需要定位,还得一个个找他们要 mock 数据。
现在有了依赖注入,要实现 mock 功能简直不要太容易,几行代码就封装一个 useMock :
import { Resource } from "../annotations/restful";
import { useIoC } from "./ioc";
import { Provider } from "./resource";

export function useMock<T extends Resource>(provider: Provider<T>, sub: Provider<T>) {
    const context = useIoC()
    context.define(provider, sub)
}
mockServer
对于已经在使用 mock Server 的接口,可以继承派生出一个子类: XXXResourceForMock,
然后通过 RESTful 设置新的 endpoint 和 resource,就可以就把请求转发到指定的服务器。
useMock(UserResourceProvider, (exchange: Exchange) => {
    @RESTful("http://mock-server:8080/backend", "users")
    class UserResourceForMock extends UserResource {

    }
    return new UserResourceForMock(exchange)
})
如果遇到问题,仔细观察endpoint是否为绝对路径,以及是否包含http://
mockOperation
如果 mock server 返回结果无法满足需求,可以单独 mock 某个方法,可以根据实际需求返回特定的结果。
useMock(UserResourceProvider, (exchange: Exchange) => {
    @RESTful("http://mock-server:8080/backend", "users")
    class UserResourceForMock extends UserResource {
        async list(page: number, pageSize: number): Promise<User[]> {
            return Promise.resolve([])
        }
        async create(user: User): Promise<Response> {
            return Promise.resolve(new Response("{}"))
        }
        async get(id: string): Promise<User> {
            return Promise.resolve({username: "", password: "", role: []})
        }
        async update(id: string, user: User): Promise<Response> {
            return Promise.resolve(new Response("{}"))
        }
        async delete(id: string): Promise<Response> {
            return Promise.resolve(new Response("{}"))
        }
    }
    return new UserResourceForMock(exchange)
})
pure_func
为了防止以上 mock 操作一不小心影响到生产环境,可以定义一个 developMockOnly 函数:
// 只用于开发环境的mock操作
function developMockOnly() {
}
把所有的 mock 操作都放到上面的函数内部,然后修改生产环境的 webpack 配置:
{
 minimizer: [
      new TerserPlugin({
        terserOptions: {
           extractComments: 'all',
           compress: {
               pure_funcs: ['console.info', 'developMockOnly']
           },
	    }
      }),
    ]
}
把 developMockOnly 加到 pure_funcs 数组中。
这样即便把 mock 操作提交到主干分支,也不会出现开发环境的mock操作不会影响到生产环境的问题。
总结
以上代码早在半年前就已经写好,奈何公司的保密措施非常严格,没有办法把代码带出来。
出来之后,想重新实现一遍的想法在脑海中酝酿许久,终于在上周末花了一天的时间就写出来大部分代码。
然后又额外花了一天时间,解决一些潜在的问题,然后写了本文分享给大家,希望大家都能从中受到启发。
后端
- 如何使用OpenFeign+WebClient实现非阻塞的接口聚合
- 从链式调用谈构造器模式与柯里化
- 2023再谈RESTful 和 GraphQL
- Spring依赖可视化分析与微服务模块划分
- 高性能编程系列——JSON优化
- 高性能编程系列——锁的膨胀与优化
- 高并发编程系列——分库分表
- 高并发编程系列——Redis缓存
- 响应式编程系列——消息队列
- 响应式编程系列——节流与去抖
- 分布式编程系列——锁与任务调度
- 分布式编程系列——事务控制:ACID与CAP
- 分布式编程系列——链路追踪
- 分布式编程系列——负载均衡
- 分布式编程系列——滚动升级
如何使用OpenFeign+WebClient实现非阻塞的接口聚合
随着微服务的遍地开花,越来越多的公司开始采用 SpringCloud 用于公司内部的微服务框架。
按照微服务的理念,每个单体应用的功能都应该按照功能正交,也就是功能相互独立的原则,划分成一个个功能独立的微服务(模块),再通过接口聚合的方式统一对外提供服务!
然而随着微服务模块的不断增多,通过接口聚合对外提供服务的中层服务需要聚合的接口也越来越多!慢慢地,接口聚合就成分布式微服务架构里一个非常棘手的性能瓶颈!
举个例子,有个聚合服务,它需要聚合 Service、Route 和 Plugin 三个服务的数据才能对外提供服务:
@Headers({ "Accept: application/json" })
public interface ServiceClient {
    @RequestLine("GET /")
    List<Service> list();
}

@Headers({ "Accept: application/json" })
public interface RouteClient {
    @RequestLine("GET /")
    List<Route> list();
}

@Headers({ "Accept: application/json" })
public interface PluginClient {
    @RequestLine("GET /")
    List<Plugin> list();
}
使用声明式的 OpenFeign 代替 HTTP Client 进行网络请求
编写单元测试
public class SyncFeignClientTest {
    public static final String SERVER = "http://devops2:8001";
    private ServiceClient serviceClient;
    private RouteClient routeClient;
    private PluginClient pluginClient;
    @Before
    public void setup(){
        BasicConfigurator.configure();
        Logger.getRootLogger().setLevel(Level.INFO);

        String service = SERVER + "/services";
        serviceClient = Feign.builder()
                .target(ServiceClient.class, service);

        String route = SERVER + "/routes";
        routeClient = Feign.builder()
                .target(RouteClient.class, route);

        String plugin = SERVER + "/plugins";
        pluginClient = Feign.builder()
                .target(PluginClient.class, plugin);
    }

    @Test
    public void aggressionTest() {
        long current = System.currentTimeMillis();
        System.out.println("开始调用聚合查询");

        serviceTest();

        routeTest();

        pluginTest();

        System.out.println("调用聚合查询结束!耗时:" + (System.currentTimeMillis() - current) + "毫秒");
    }

    @Test
    public void serviceTest(){
        long current = System.currentTimeMillis();
        System.out.println("开始获取Service");

        String service = serviceClient.list();
        System.out.println(service);
        System.out.println("获取Service结束!耗时:" + (System.currentTimeMillis() - current) + "毫秒");
    }

    @Test
    public void routeTest(){
        long current = System.currentTimeMillis();
        System.out.println("开始获取Route");

        String route = routeClient.list();
        System.out.println(route);
        System.out.println("获取Route结束!耗时:" + (System.currentTimeMillis() - current) + "毫秒");
    }

    @Test
    public void pluginTest(){
        long current = System.currentTimeMillis();
        System.out.println("开始获取Plugin");

        String plugin = pluginClient.list();
        System.out.println(plugin);
        System.out.println("获取Plugin结束!耗时:" + (System.currentTimeMillis() - current) + "毫秒");
    }
}
测试结果:
开始调用聚合查询
开始获取Service
{"next":null,"data":[]}
获取Service结束!耗时:134毫秒
开始获取Route
{"next":null,"data":[]}
获取Route结束!耗时:44毫秒
开始获取Plugin
{"next":null,"data":[]}
获取Plugin结束!耗时:45毫秒
调用聚合查询结束!耗时:223毫秒
Process finished with exit code 0
可以明显看出:聚合查询查询所用的时间 223毫秒 = 134毫秒 + 44毫秒 + 45毫秒
也就是聚合服务的 请求时间 与 接口数量 成正比关系,这种做法显然不能接受!
而解决这种问题的最常见做法就是预先创建线程池,通过多线程并发请求接口进行接口聚合!
这种方案在网上随便百度一下就能找到好多,今天我就不再把它的代码贴出来!而是说一下这个方法的缺点:
原本 JavaWeb 的主流 Servlet容器 采用的方案是一个HTTP请求就使用一个线程和一个Servlet进行处理!
这种做法在并发量不高的情况没有太大问题,但是由于摩尔定律失效了,单台机器的线程数量仍旧停留在一万左右,在网站动辄上千万点击量的今天,单机的线程数量根本无法应付上千万级的并发量!
而为了解决接口聚合的耗时过长问题,采用线程池多线程并发网络请求的做法,更是火上浇油!原本只需一个线程就搞定的请求,通过多线程并发进行接口聚合,就把处理每个请求所需要的线程数量给放大了,急速降低系统可用线程的数量,自然也降低系统的并发数量!
这时,人们想起从 Java5 开始就支持的 NIO 以及它的开源框架 Netty !基于 Netty 以及 Reactor模式 ,Java生态圈出现了SpringWebFlux 等异步非阻塞的 JavaWeb 框架!Spring5 也是基于SpringWebFlux进行开发的!有了异步非阻塞服务器,自然也有异步非阻塞网络请求客户端 WebClient!
今天我就使用 WebClient 和 ReactiveFeign 做一个异步非阻塞的接口聚合教程:
首先,打开 pom.xml 引入依赖
<dependency>
    <groupId>com.playtika.reactivefeign</groupId>
    <artifactId>feign-reactor-core</artifactId>
    <version>1.0.30</version>
    <scope>test</scope>
</dependency>
<dependency>
    <groupId>com.playtika.reactivefeign</groupId>
    <artifactId>feign-reactor-webclient</artifactId>
    <version>1.0.30</version>
    <scope>test</scope>
</dependency>
然而基于 Reactor Core 重写 Feign 客户端,就是把原本接口返回值:List<实体> 改成 FLux<实体> ,实体 改成 Mono<实体>
@Headers({ "Accept: application/json" })
public interface ServiceClient {
    @RequestLine("GET /")
    Flux<Service> list();
}

@Headers({ "Accept: application/json" })
public interface RouteClient {
    @RequestLine("GET /")
    Flux<Service> list();
}

@Headers({ "Accept: application/json" })
public interface PluginClient {
    @RequestLine("GET /")
    Flux<Service> list();
}
然后编写单元测试
public class AsyncFeignClientTest {
    public static final String SERVER = "http://devops2:8001";
    private CountDownLatch latch;
    private ServiceClient serviceClient;
    private RouteClient routeClient;
    private PluginClient pluginClient;

    @Before
    public void setup(){
        BasicConfigurator.configure();
        Logger.getRootLogger().setLevel(Level.INFO);
        latch= new CountDownLatch(3);

        String service= SERVER + "/services";
        serviceClient= WebReactiveFeign
                .<ServiceClient>builder()
                .target(ServiceClient.class, service);

        String route= SERVER + "/routes";
        routeClient= WebReactiveFeign
                .<RouteClient>builder()
                .target(RouteClient.class, route);

        String plugin= SERVER + "/plugins";
        pluginClient= WebReactiveFeign
                .<PluginClient>builder()
                .target(PluginClient.class, plugin);
}

    @Test
    public void aggressionTest() throws InterruptedException {
        long current= System.currentTimeMillis();
        System.out.println("开始调用聚合查询");

        serviceTest();

        routeTest();

        pluginTest();

        latch.await();
        System.out.println("调用聚合查询结束!耗时:" + (System.currentTimeMillis() - current) + "毫秒");
}

    @Test
    public void serviceTest(){
        long current= System.currentTimeMillis();
        System.out.println("开始获取Service");

        serviceClient.list()
                .subscribe(result ->{
                    System.out.println(result);
                    latch.countDown();
                    System.out.println("获取Service结束!耗时:" + (System.currentTimeMillis() - current) + "毫秒");
                });
    }

    @Test
    public void routeTest(){
        long current= System.currentTimeMillis();
        System.out.println("开始获取Route");

        routeClient.list()
                .subscribe(result ->{
                    System.out.println(result);
                    latch.countDown();
                    System.out.println("获取Route结束!耗时:" + (System.currentTimeMillis() - current) + "毫秒");
                });

}

    @Test
    public void pluginTest(){
        long current= System.currentTimeMillis();
        System.out.println("开始获取Plugin");

        pluginClient.list()
                .subscribe(result ->{
                    System.out.println(result);
                    latch.countDown();
                    System.out.println("获取Plugin结束!耗时:" + (System.currentTimeMillis() - current) + "毫秒");
                });
    }
}
这里的关键点就在于原本 同步阻塞 的请求,现在改成 异步非阻塞 了,所以需要使用 CountDownLatch 来同步。
在获取到接口后调用 CountDownLatch.coutdown() ,在调用所有接口请求后调用 CountDownLatch.await() 等待所有的接口返回结果再进行下一步操作!
测试结果:
开始调用聚合查询

开始获取Service

开始获取Route

开始获取Plugin

{"next":null,"data":[]}

{"next":null,"data":[]}

获取Plugin结束!耗时:215毫秒

{"next":null,"data":[]}

获取Route结束!耗时:216毫秒

获取Service结束!耗时:1000毫秒

调用聚合查询结束!耗时:1000毫秒

Process finished with exit code 0
显然,聚合查询所消耗的时间不再等于所有接口请求的时间之和,而是接口请求时间中的最大值!
下面开始性能测试: 普通Feign接口聚合测试调用1000次:
开始调用聚合查询
开始获取Service
{"next":null,"data":[]}
获取Service结束!耗时:169毫秒
开始获取Route
{"next":null,"data":[]}
获取Route结束!耗时:81毫秒
开始获取Plugin
{"next":null,"data":[]}
获取Plugin结束!耗时:93毫秒
调用聚合查询结束!耗时:343毫秒
summary: 238515, average: 238
使用WebClient进行接口聚合查询1000次:
开始调用聚合查询
开始获取Service
开始获取Route
开始获取Plugin
{"next":null,"data":[]}
{"next":null,"data":[]}
获取Route结束!耗时:122毫秒
{"next":null,"data":[]}
获取Service结束!耗时:122毫秒
获取Plugin结束!耗时:121毫秒
调用聚合查询结束!耗时:123毫秒
summary: 89081, average: 89
测试结果中,WebClient的测试结果恰好相当于普通FeignClient的三分之一!正好在意料之中!
前段时间,使用构造器模式重构了http 工具类库,顺带优化一下AuditLog 模块的代码,然后很意外地被领导发现,他跟我说:这就是链式调用。这句话勾起我多年前的回忆
type LogLevel = string
const (
    Debug LogLevel = "Debug"
    Info LogLevel = "Info"
    Warn LogLevel = "Warn"
    Error LogLevel = "Error"
)

struct AuditLog {
    User string
    Operation string
    Level LogLevel
    Result string
    Timestamp time.Date
}

// 重构前
sendAuditLog({
    User: "admin",
    Operation: "delete user",
    Result: "failed",
    Level: "Error",
    Timestamp: "2022-10-13"
})

// 重构后
Builder().User("admin").Operation("delete user").Error("Failed")
早在十多年前,也就是2012年左右的光景,那时候前端还是jQuery的天下,大家非常熟悉的React、Angular和Vue三剑客还没兴起。我作为一个刚入学的大学生接触前端的第一个框架就是jQuery,那时候IE浏览器的份额还很高,jQuery抹平IE、Chrome和FireFox之间的差异,而且它特有的链式调用 更是操作DOM的一把利器。
$("selector").html("abcd")
但随着技术的演进,尤其是V8引擎的强大性能改进,使得Javascript从一个玩具语言逐渐成为最受欢迎的编程语言,像React、Angular和Vue这样的MVVM类库框架逐渐兴起,jQuery逐渐退出舞台。
const eventNumbers = \[1,2,3,4,5,6\].filter(num => num % 2 == 0)
    .map(item => \`${item} is event number\`)
虽然像Array、Map这样的数据结构还支持map、filter等链式操作,但很少人再提起链式调用,反而是隔壁Java用一个全新的词汇 Stream API,但Java的实现是通过Stream的抽象接口,局限于实现Collection接口的数据结构。
直到后来专门去学习函数式编程,接触柯里化 等概念。可惜Go 对函数式编程的支持非常一般,连最基本的箭头函数都不支持,所以不打算像Rust那样使用宏实现自动柯里化,退而求其次,选择中规中矩的OOP 常见的构造器模式,笨是笨点,但至少容易理解和维护。
type LogLevel = string
const (
    Debug LogLevel = "Debug"
    Info LogLevel = "Info"
    Warn LogLevel = "Warn"
    Error LogLevel = "Error"
)

struct AuditLog {
    User string
    Operation string
    Result string
    Level LogLevel
    Timestamp Date
}

func (log *AuditLog) User(user string) OperationInterface {
    log.User = user
    return log
}

func (log *AuditLog) Operation(op string) LevelInterface {
    log.Operation = op
    return log
}

func (log *AuditLog) Debug(result string) *AuditLog {
    log.Level = Debug
    log.Result = result
    return log
}

func (log *AuditLog) Info(result string) *AuditLog {
    log.Level = Info
    log.Result = result
    return log
}

func (log *AuditLog) Warn(result string) *AuditLog {
    log.Level = Warn
    log.Result = result
    return log
}

func (log *AuditLog) Error(result string) *AuditLog {
    log.Level = Error
    log.Result = result
    return log
}

// 构造函数
func NewAuditLog() *AuditLog {
    return &AuditLog{
        User: "",
        Operation: "",
        Result: "",
        Level: Error,
        Timestamp: time.Now()
    }
}

// 构造器模式
func Builder() UserInterface {
    return NewAuditLog()
}

// 针对User字段封装的setter函数
interface UserInterface {
    User(string) OperationInterface
}

// 针对Operation字段封装的setter函数
interface OperationInterface {
    Operation(string)
}

// 针对Level字段封装的setter函数,对枚举进行特殊处理
interface LevelInterface {
    Debug(string) *AuditLog
    Info(string) *AuditLog
    Warn(string) *AuditLog
    Error(string) *AuditLog
}
重构后的代码看起来更简洁且条理清晰,最重要的是看起来像符合自然语言的阅读习惯,这被称之为代码的 语义化
// 重构后
Builder().User("admin").Operation("delete user").Error("Failed")
以上的重构过程需要遵守哪些规则或者诀窍,我列出来以下5点供大家参考:
- 每个字段都抽取出一个
interface,interface 包裹着setter方法 - 通过控制
interface内部的setter方法返回值类型来控制方法的调用顺序,比如UserInterface的返回值是OperationInterface - 对于类型是
枚举的字段,比如说Level字段的类型就是只有Debug、Info等有限个数的,可以分别创建别名方法,比如Debug()、Info() - 每个枚举类型的
setter方法都可以额外设置一个非枚举的字段,比如说Debug(string)能够同时设置Level和Result两个字段的值。 - 最后一个字段的
setter方法要返回完整的结构体,或者被特定interface包裹起来的结构体,目的是隐藏实现细节。
以上过程非常公式化,完全可以通过代码自动生成,然后再后期人为调整一下顺序,使得方法调用顺序更适合阅读习惯。
我认为比较值得讨论的点,就是使用 interface 代替原来的 枚举,让代码看起来更简洁易懂且语义化。
围绕着 使用 interface 代替 枚举 的话题,我想进一步探讨 Go 语言中如何实现复杂类型枚举
由于Go语言的限制,Go语言中的枚举都是通过数字、字符串等基本类型来模拟的,不存在真正意义上的枚举。
要实现复杂结构的枚举,往往需要借助全局变量,但是全局变量并不是只读,在运行过程中容易被篡改,存在数据竞争的风险。
struct ResponseEnum {
    Code int
    MsgEn string
    MsgCn string
    Extra Extra
}

struct Extra {
    StatusCode string
    Message string
}

var Succeed = ResponseEnum {
    Code: 200,
    MsgEn: "request succeed",
    MsgCn: "请求成功"
}
var BadRequest = ResponseEnum {
    Code: 400,
    MsgEn: "invalid request",
    MsgCn: "请求参数有误"
}
var Unauthorized = ResponseEnum {
    Code: 401,
    MsgEn: "needs login",
    MsgCn: "需要登陆"
}
var NotFound = ResponseEnum {
    Code: 404,
    MsgEn: "the requested resource is not existed",
    MsgCn: "资源不存在"
}
使用 interface 替换 枚举 重构:
interface Response {
    Code() int
    MsgEn() string
    MsgCn() string
    Extra() *Extra
}

struct httpResponse {
    Code int `json: "code"`
    MsgEn string `json: "msgEn"`
    MsgCn string `json: "msgCn"`
    Extra Extra `json: "extra"`
}

func (resp *httpResponse) Code() int {
    return resp.Code
}

func (resp *httpResponse) MsgEn() string {
    return resp.MsgEn
}

func (resp *httpResponse) MsgCn() string {
    return resp.MsgCn
}

func (resp *httpResponse) Extra() Extra {
    return resp.Extra
}

func Succeed(extra Extra) Response {
    return &httpResponse {
        Code: 200,
        MsgEn: "request succeed",
        MsgCn: "请求成功",
        Extra: extra
    }
}

func BadRequest(extra Extra) Response {
    return &httpResponse {
        Code: 400,
        MsgEn: "invalid request",
        MsgCn: "请求参数有误"
        Extra: extra
    }
}

func Unauthorized(extra Extra) Response {
    return &httpResponse {
        Code: 401,
        MsgEn: "needs login",
        MsgCn: "需要登陆"
        Extra: extra
    }
}

func NotFound(extra Extra) Response {
    return &httpResponse {
        Code: 401,
        MsgEn: "the requested resource is not existed",
        MsgCn: "资源不存在"
        Extra: extra
    }
}
重构完后,原本的全局变量都变成公开函数,每次调用函数都会返回一个全新结构体示例,自然就不会存在数据竞争的场景。
而且返回的结果类型都是 interface ,只提供读取操作屏蔽修改操作,消除运行中篡改数据的可能,提高代码的健壮性。
并且可以通过创建 函数别名 的方式自定义枚举:
// DuplicatedName 所有场景都通用的自定义重名资源错误枚举
func DuplicatedName() Response {
    return BadRequest(Extra{StatusCode: "CustomizedCode001", Message: "资源名称已存在"})
}

// ImageError 跟镜像相关的错误枚举
func ImageError(code string, msg string) Response {
    // 状态码统一加上IMG前缀
    return BadRequest(Extra{StatusCode: "IMG" + code, Message: msg})
}
总结
链式调用 Chain Call 更像是一种俗称,它常见的实现方式有两种:CPS(Continuation Passing Style) 和 State Machine两种,
前者是函数式的柯里化 Currying ,一般都是延迟求值 lazy evaluation,具体做法是把中间状态保存到函数栈帧中,默认是线程安全的;
后者是面向对象的状态机 State Machine ,也可以做到延迟求值,具体做法是把中间状态保存到结构体中,但因为函数栈帧的大小有限,最终都会逃逸到堆上,因此性能不是最佳,默认也不是线程安全的,优点是易于理解。
前段时间组内搞代码检视,经常能看到一些 “挂着 RESTful 羊头,卖的却是 GraphQL 狗肉”的 API 设计。
举个例子,假如后台有两种资源用户 User 和 群组 Group ,按照RESTful的规范,他们设计以下API端点:
# 获取用户列表
GET /users
# 获取指定用户
GET /user/{id}
# 创建用户
POST /users
# 修改用户
PUT /user/{id}
# 删除用户
DELETE /user/{id}

# 获取群组列表
GET /groups
# 获取指定群组
GET /group/{id}
# 创建群组
POST /groups
# 修改群组
PUT /group/{id}
# 解散群组
DELETE /group/{id}
咋一看没啥问题,可是到了后面,要实现 “用户加入群组” 和 “用户退出群组” 两个特性时,他们给出的API设计:
# 用户加入群组
PATCH /group/{id}
{
  "addMembers": ["userID"]
}

# 用户退出群组
PATCH /group/{id}
{
  "deleteMembers": ["userID"]
}
我当场就蚌埠住了,这哪里是 RESTful 风格,这不就是他们老大深痛恶绝的 GraphQL ?
眼看我就要当场发飙,有个老手赶紧出来圆场,他给出以下API设计:
# 用户加入群组
PATCH /user/{id}/group/{groupID}

# 用户退出群组
DELETE /user/{id}/group/{groupID}
这个设计看起来是解决刚才的问题,但实际上只是掩耳盗铃。 我接着追问: “管理员邀请用户加入群组” 和 “管理员将用户踢出群组” 要怎么设计呢? 那个老手依瓢画葫芦给出以下设计:
# 管理员邀请用户加入群组
PATCH /group/{id}/user/{userID}

# 管理员将用户踢出群组
DELETE /group/{id}/user/{userID}
眼看他们还不醒悟,我就接着追问:“用户加入群组需要管理员同意” 和 “管理员邀请用户加入群组需要用户同意” 又怎么实现呢? 这下子老手也没辙,只能说这块的代码需要重新设计。
我让他们把原来的设计文档重新拿出来检视,然后发现很多地方都不符合规范,连基本的实体关系图ER都没有! 我忍不住吐槽:怪不得当年我一个人拿着不到一半的工资,连前后端一起搞,效率却比这帮985/211的高材生/海归还要高,而他们连一个最基本的CURD都要不断地返工! 原来招人的HR完全不考虑专业是否对口,只看毕业院校和学历,结果这帮非科班出身的人连ER图都不会,更别说更复杂一点的类图、活动图以及泳道图,要知道对科班出身的人来说画UML是基本功!
其实他们的设计里面已经有了 User 和 Group 两张实体表,再增加一张 Relation 关系表:
struct Relation {
    id string
    user_id string
    group_id string
    status string # 根据cookie的session获取当前用户id
    # 再判断当前用户是不是当前group的管理员
    # 如果是则管理员邀请用户,把status设置为"wait_for_user_accept"
    # 否则就是用户申请加入群组,把status设置为"wait_for_admin_approve"
}
然后这样设计API:
# 用户加入群组
POST /relations
{
  user: "abc",
  group: "ikun"
}

# 用户退出群组
DELETE /relations/{id}

# 管理员邀请用户加入群组
POST /relations
{
  user: "abc",
  group: "ikun"
}

# 管理员将用户踢出群组
DELETE /relations/{id}
回头总结,不难发现,大多数人在实践 RESTful 规范时,最容易犯的错误就是处理嵌套资源的时候,容易设计出 /parent/xxx/sub/xxx 这样的API。这种设计咋一看起来确实非常容易理解,但其实后期非常难以维护,尤其是遇到 n:m 多对多的关系时,这种嵌套的API设计就是一场灾难。
即便是 1:n 一对多的情况下,嵌套的API设计看起来没有问题,但后期当子资源 n 越来越大的时候,单独增加/删除某个子资源需要把所有资源都获取一遍,就非常容易形成性能瓶颈,并且没办法通过分库分表的方式进行横向扩容。
尽管我们可以换成 GraphQL 的风格,通过 addSub 和 delSub 的方式单独新增或删除某个子资源,来避免每次都需要获取所有的子资源。但我们也必须要考虑并发更新资源频繁引发冲突的风险;尤其越来越多的Java开发转向基于Go的云原生开发,为了方便维护不再额外引入SQL数据库,直接使用etcd,但etcd本身也有mvcc机制来保证数据的一致性,这样就会导致并发更新资源的冲突!
经过这次事情,我也彻底明白了,真正掌握RESTful规范,离不开对关系模型的深厚功底;尽管我们从SQL数据库切换到etcd这类NoSQL数据库,按道理API设计规范应该相应地换成GraphQL与对象模型紧密相连的规范。
但考虑团队水平参差不齐,后台API接口设计规范还是要坚持 RESTful 为主,先把基于关系数据库的基本功练好!
前端团队是可以基于 GraphQL 规范实现Backend for Frontend,搞一个接口聚合模块,作为性能优化手段,减少首页白屏时间。
前言
19年的时候,主要负责微服务治理平台BOMS交付工作,期间客户提到在微服务模块拆分方面需要咨询。
当时我还只是技术负责人,没有深入了解这方面的需求,只是网上找了点资料发给客户,再结合材料简单讲一下“正交分解”等原则。
后来听说客户找到埃森哲做培训,每天的培训费用大概是好几千,后面领导打算让我当架构师,可惜我拒绝了,现在想想非常可惜,但我并不是想做培训老师, 而是想能不能制作一款可视化的分析工具,给微服务模块拆分提供可量化的拆分依据,以及评估拆分前后的性能指标变化。
Spring依赖分析
我首先想到基于代码扫描的静态分析,得益于 Spring 的架构优势,做起来并不难,只需要把 Spring IoC 容器保存的 Bean 信息导出来即可,而正好 Spring Boot Actuator 模块刚好提供 /beans 接口用于导出Bean信息,Bean信息结构大概如下:
{
    "contexts": {
        "school-service": {
            "beans": {
                "spring.jpa-org.springframework.boot.autoconfigure.orm.jpa.JpaProperties": {
                    "aliases": [],
                    "scope": "singleton",
                    "type": "org.springframework.boot.autoconfigure.orm.jpa.JpaProperties",
                    "resource": null,
                    "dependencies": []
                }
            }
        }
    }
}
对于没有使用 Spring Boot 的老旧项目,以下就是参考 Actuator 源码实现的替代实现:
package com.springcloud.school;

import com.fasterxml.jackson.annotation.JsonProperty;
import org.springframework.beans.factory.annotation.Autowired;
import org.springframework.beans.factory.config.BeanDefinition;
import org.springframework.beans.factory.config.ConfigurableBeanFactory;
import org.springframework.beans.factory.config.ConfigurableListableBeanFactory;
import org.springframework.context.ApplicationContext;
import org.springframework.context.ConfigurableApplicationContext;
import org.springframework.stereotype.Component;
import org.springframework.util.StringUtils;
import java.util.HashMap;
import java.util.Map;

@Component()
public class CustomBeansEndpoint {
@Autowired
ConfigurableApplicationContext context;

public ApplicationBeans beans() {
    Map contexts = new HashMap<>();

    for(ConfigurableApplicationContext context = this.context; context != null; context = getConfigurableParent(context)) {
        contexts.put(context.getId(), ContextBeans.describing(context));
    }

    return new ApplicationBeans(contexts);
}

static ConfigurableApplicationContext getConfigurableParent(ConfigurableApplicationContext context) {
    ApplicationContext parent = context.getParent();
    return parent instanceof ConfigurableApplicationContext ? (ConfigurableApplicationContext)parent : null;
}

public static class BeanDescriptor {
    @JsonProperty("aliases")
    String[] aliases;
    @JsonProperty("scope")
    String scope;
    @JsonProperty("type")
    Class type;
    @JsonProperty("resource")
    String resource;
    @JsonProperty("dependencies")
    String[] dependencies;

    private BeanDescriptor(String[] aliases, String scope, Class type, String resource, String[] dependencies) {
        this.aliases = aliases;
        this.scope = StringUtils.hasText(scope) ? scope : "singleton";
        this.type = type;
        this.resource = resource;
        this.dependencies = dependencies;
    }
}

public static class ContextBeans {
    @JsonProperty("beans")
    Map beans;
    @JsonProperty("parentId")
    String parentId;

    ContextBeans(Map beans, String parentId) {
        this.beans = beans;
        this.parentId = parentId;
    }

    static ContextBeans describing(ConfigurableApplicationContext context) {
        if (context == null) {
            return null;
        } else {
            ConfigurableApplicationContext parent = getConfigurableParent(context);
            return new ContextBeans(describeBeans(context.getBeanFactory()), parent != null ? parent.getId() : null);
        }
    }

    static Map describeBeans(ConfigurableListableBeanFactory beanFactory) {
        Map beans = new HashMap<>();
        String[] var2 = beanFactory.getBeanDefinitionNames();
        int var3 = var2.length;

        for(int var4 = 0; var4 < var3; ++var4) {
            String beanName = var2[var4];
            BeanDefinition definition = beanFactory.getBeanDefinition(beanName);
            if (isBeanEligible(beanName, definition, beanFactory)) {
                beans.put(beanName, describeBean(beanName, definition, beanFactory));
            }
        }

        return beans;
    }

    static BeanDescriptor describeBean(String name, BeanDefinition definition, ConfigurableListableBeanFactory factory) {
        return new BeanDescriptor(factory.getAliases(name), definition.getScope(), factory.getType(name), definition.getResourceDescription(), factory.getDependenciesForBean(name));
    }

    static boolean isBeanEligible(String beanName, BeanDefinition bd, ConfigurableBeanFactory bf) {
        return bd.getRole() != 2 && (!bd.isLazyInit() || bf.containsSingleton(beanName));
    }
}

public static class ApplicationBeans {
    @JsonProperty("contexts")
    Map contexts;

    ApplicationBeans(Map contexts) {
        this.contexts = contexts;
    }

    public Map getContexts() {
        return this.contexts;
    }
}

}
新建 CustomBeansEndpoint.java 文件,然后把以上Java代码复制粘贴进文件中,最后新增 BeanController
package com.springcloud.school.controller;

import com.springcloud.school.CustomBeansEndpoint;
import org.springframework.beans.factory.annotation.Autowired;
import org.springframework.web.bind.annotation.GetMapping;
import org.springframework.web.bind.annotation.RequestMapping;
import org.springframework.web.bind.annotation.RestController;

@RestController@RequestMapping("/beans")
public class BeanController {
    @Autowired()
    CustomBeansEndpoint beansEndpoint;
    @GetMapping("/")
    public Object beans() {
        return beansEndpoint.beans();
    }
}
把代码修改完再运行起来,在浏览器打开 https://localhost:8080/beans 就会返回JSON内容,然后复制JSON字符串保存到 beans.json 文件。
切记:为了稳妥起见,建议只在开发环境运行,不要提交或部署到生产/预生产环境,以免造成不可挽回的损失。
可视化分析
有了JSON数据,就可以进行可视化分析,首先去下载安装 Spring Module Analyzer 工具。
这是一款基于Qwik + Echarts 打造,专门用于Spring模块可视化分析的工具。目前该工具使用 tauri 打包成Web App,支持 Windows Mac Linux 等平台(暂不支持win7、xp),可以根据实际需求下载安装后进行使用。
打开工具后,在首页点击中间的 开始 按钮,选中上一步导出的 beans.json 文件,然后就自动跳转到 依赖分析 页面
看到满屏密密麻麻的文字先别慌,因为actuator导出的bean很多是spring框架自带的,可以在左上方 类名 右侧的输入框,输入你的 package 包名,然后点击最右侧的 过滤 按钮就可以把多余的bean过滤掉。比如输入 com.springclcoud 再点击 过滤 按钮:
现在可以看到不相干的bean已经被过滤掉,还可以通过鼠标滚轮来缩放画面。
如果你的项目包含的bean数量非常多,可以追加子包名进行过滤,比如说 com.springcloud.school ,
随着包名的不断变长,原来连成一片的点集,会分割成几个相互独立的小点集,这些小点集就相当于划分好的微服务模块。
以上基于代码的静态分析,实际上就是基于包名进行微服务模块划分,有一个非常重要的前提就是先前的项目结构需要非常合理,而实际情况却是大部分项目结构非常混乱,因此以包名作为微服务模块划分的依据并不合理。
但是有这么一个工具,可以非常直观了解现有的项目结构,评估微服务模块拆分之前的代码质量还是很有帮助的,尤其是当你刚接手一个完全陌生的项目,spring 依赖分析是快速了解项目结构的有力工具。
调用链分析
前面说到的静态分析虽然非常直观,但明显缺乏量化指标。
比方说 A模块 同时依赖于 B模块 和 C模块 ,A模块 每分钟会调用 B模块 上百次,但只会调用 C模块 一次,这种情况静态分析是无法进行有效的模块划分,因此我们需要在运行时收集数据才能正确划分。
简单来说,就是通过 Spring AOP 给特定包下的所有方法织入一段代码逻辑,用于统计各模块之间相互调用的次数以及耗时,具体做法就是新建 Profile.java 文件,然后写入以下代码:
package com.springcloud.school;

import org.aspectj.lang.ProceedingJoinPoint;
import org.aspectj.lang.annotation.Around;
import org.aspectj.lang.annotation.Aspect;
import org.springframework.stereotype.Component;
import java.util.Stack;

@Aspect
@Component
public class Profile {
    // ThreadLocal用于解决线程安全问题,每个线程的方法栈是独占的,因此可以避免冲突
    ThreadLocal> methodStack = new ThreadLocal<>() {
        @Override
        protected Stack initialValue() {
            return new Stack<>();
        }
    };

    @Around("execution(* com.springcloud.school..*.*(..)) && !bean(profile)")
    public void count(ProceedingJoinPoint pj) {
        Stack stack = methodStack.get();
        String peak = stack.empty() ? "root" : stack.peek();
        String className = pj.getSignature().getDeclaringTypeName();
        stack.push(className);
        long start = System.currentTimeMillis();
        try {
            pj.proceed();
        } catch (Throwable e) {
            throw new RuntimeException(e);
        } finally {
            long end = System.currentTimeMillis();
            long gap = end - start;
            // 这里选择直接把调用记录输出到日志,有条件的可以选发送到消息队列进一步处理
            System.out.println("trace: " + peak + " -> " + className + " : " + gap);
            stack.pop();
        }
    }
}
解释一下统计调用次数以及耗时的思路:
首先初始化一个栈,然后每当方法被调用之前,就把方法名称入栈,方法调用结束后就出栈,然后把结果输出到日志文件或者消息队列,这里为了方便演示直接用 System.out.println。
这里记得把 @Around("execution(* com.springcloud.school..*.*(..)) && !bean(profile)") 的 com.springcloud.school 换成你项目所用的包名,至于最右边的 !bean(profile) 就是把 Profile 类给排除,因为我把 Profile.java 也保存到 com.springcloud.school 下。
接着把修改后的代码放到环境上运行,然后跑一下全量接口测试,测试尽可能覆盖所有的业务模块,根据实际情况调整收集时长,等积累足够多的调用记录,就可以进行下一步:处理收集结果。
切记:为了安全起见,建议只在开发环境运行,不要提交或部署到生产/预生产环境,以免料
这里只说输出到日志的处理方法,首先根据前缀 trace: 过滤得到相关的调用记录,然后把每行的箭头 -> 和 冒号 : 替换成逗号 , ,然后保存到 trace.csv 文件,最终的文件结构如下:
com.springcloud.school.controller.BeanController,com.springcloud.school.CustomBeansEndpoint,10
root,com.springcloud.school.controller.BeanController,39
com.springcloud.school.service.BaseServiceImpl,org.springframework.data.repository.PagingAndSortingRepository,323
第一列是调用方,第二列是被调用方,第三列是耗时,三者通过逗号分割,只要符合这个规则的csv文件就可以被用于可视化分析。
因此微服务模块划分的粒度最小也是类,很少到方法级别,所以调用方和被调用方其实是方法所属的类,而不是方法名。
可视化分析
我们重新打开之前的 Spring Module Analyzer 工具,然后点击右边 链路分析 按钮,再点击下方 开始 按钮,选择之前保存 trace.csv 文件,然后点击 确定 按钮
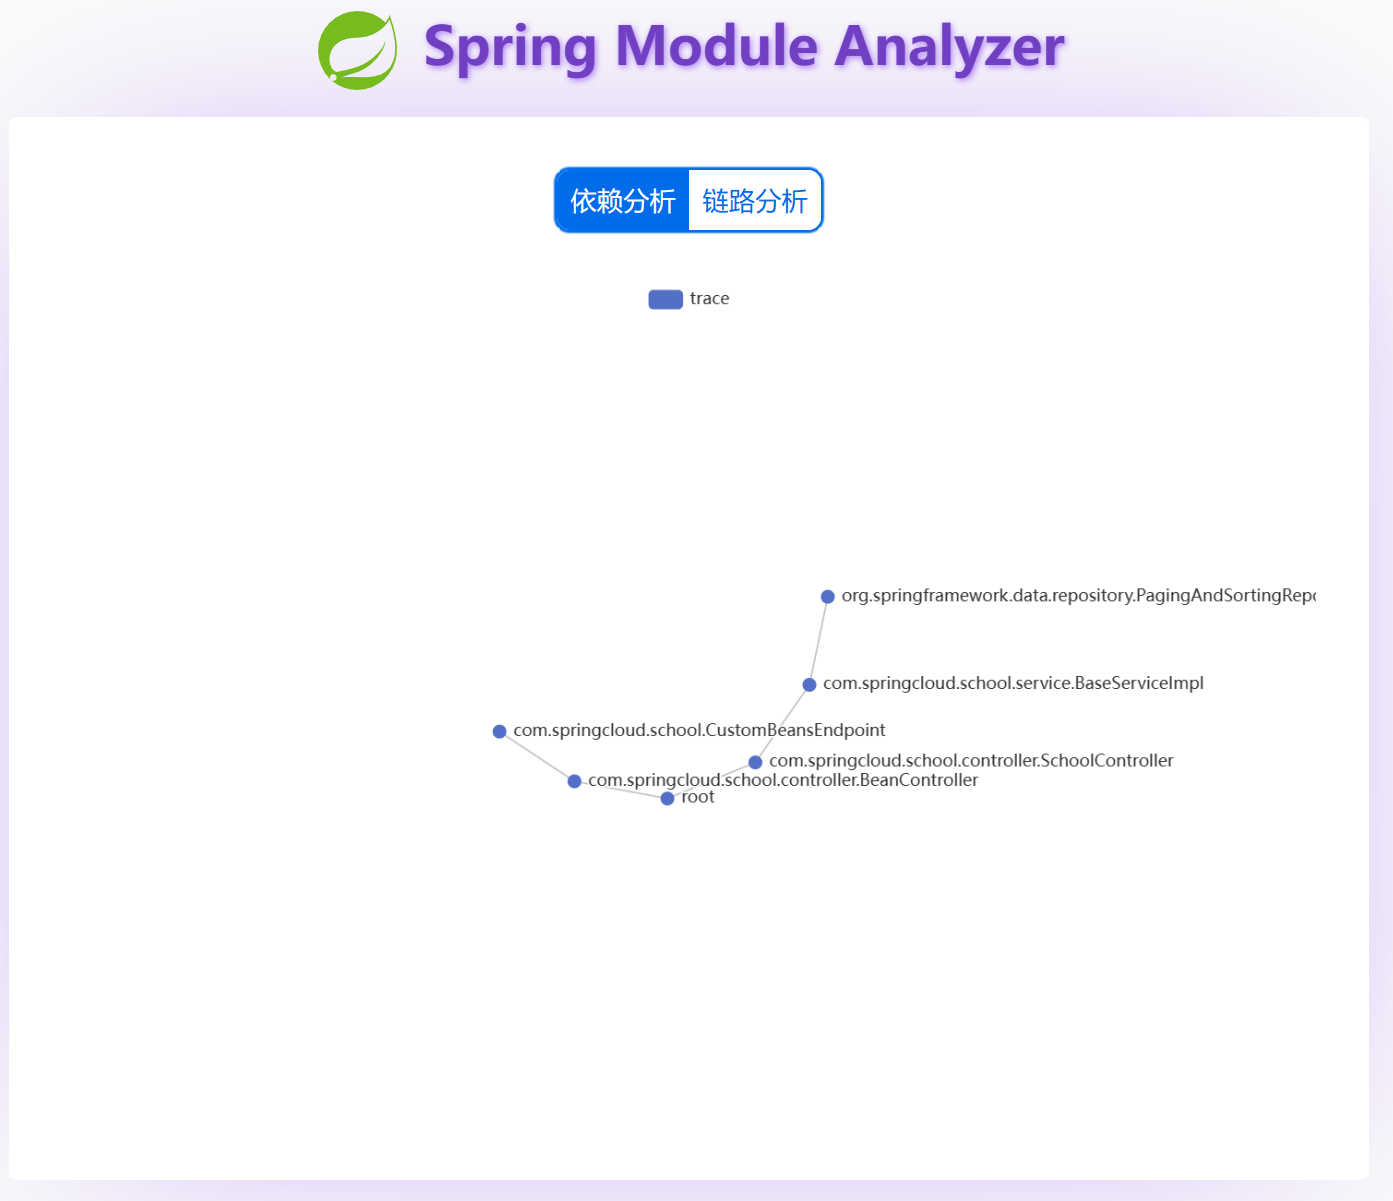
进入 链路分析 页面,左上角 起点 和 终点 两个输入框,可以根据包名进行过滤,和之前的依赖分析大同小异
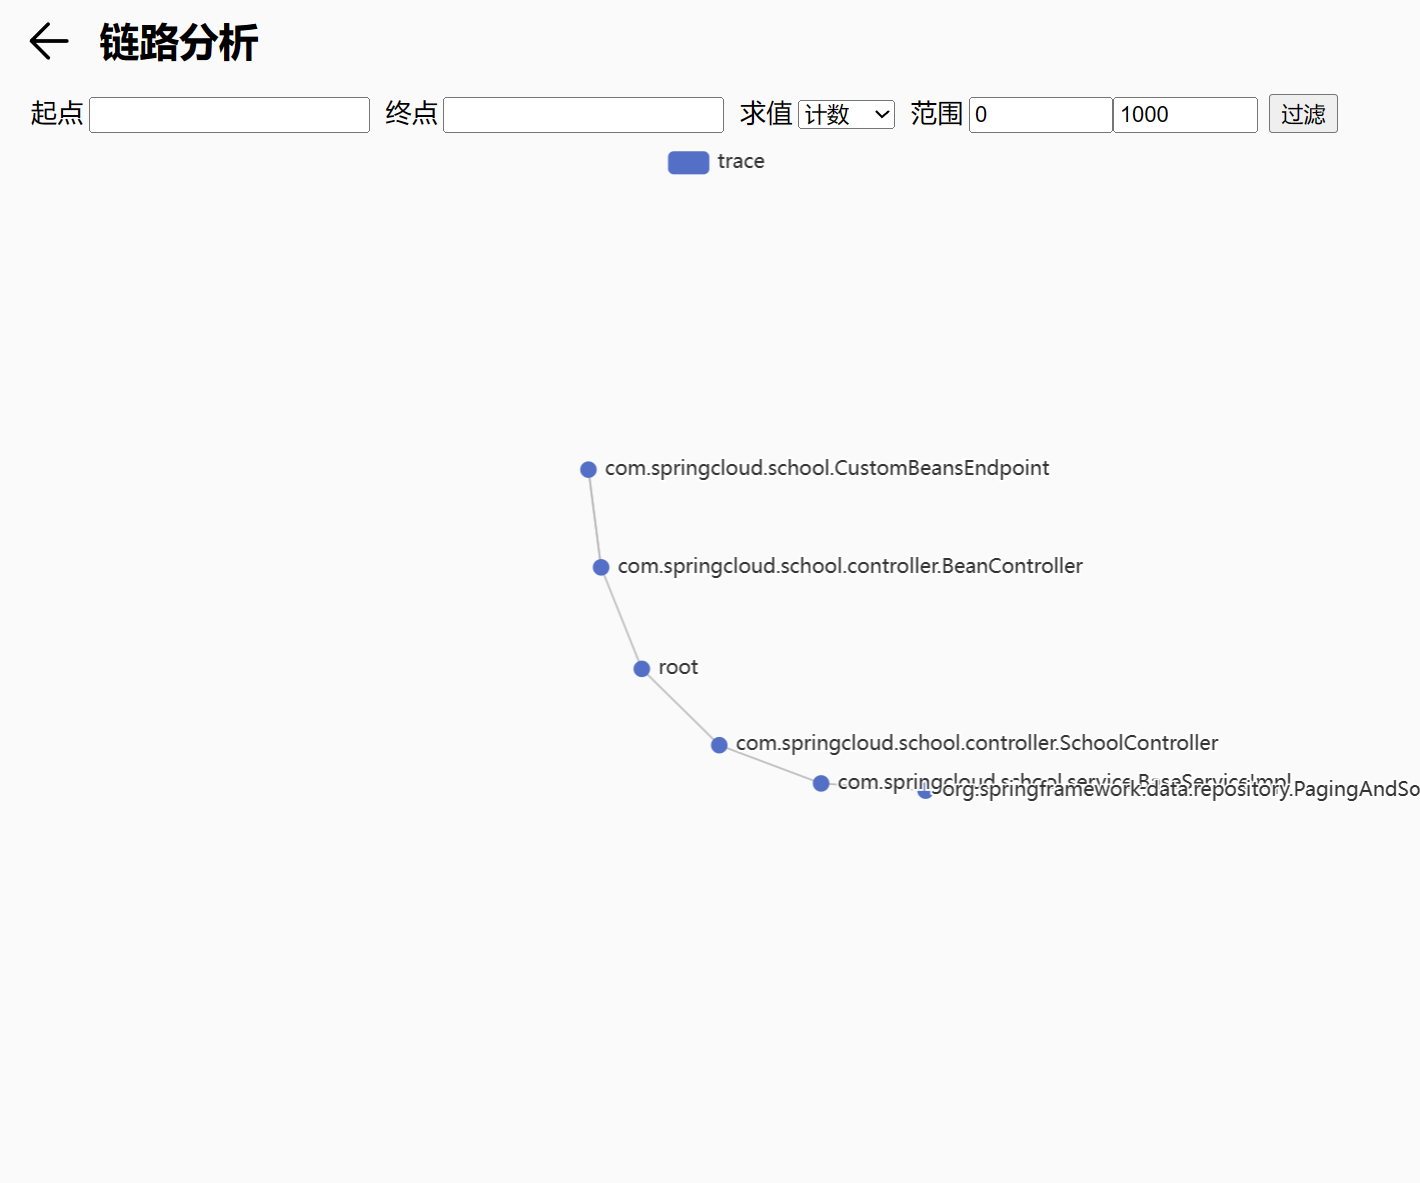
和前面不同的是多了 求值 下拉框,以及 范围 输入框。
“求值” 有五个选项:计数、平均值、求和、最小值 和 最大值 。以下是各选项适用的场景:
计数:就是累计两个模块之间的调用次数,可以配合调高范围的下界,来过滤掉某些出现次数很少的调用记录,从而分离出更多的点集,自动完成模块划分;也可以调低范围的上限,过滤某些因为循环或递归调用频繁出现的记录;平均值:就是用总的耗时除以总的调用次数,得出每次调用方法的平均耗时,可用于评估微服务模块划分前的实际延迟,一般平均耗时低于100毫秒的模块不宜拆分,因为微服务模块之间RESTful接口调用基本上都大于100毫秒,把原本平均耗时大于100毫秒的模块拆分到不同微服务并不会显著增加系统延迟;求和:两个模块之间相互调用所需要的总耗时最小值:两个模块之间相互调用耗时的最小值最大值:两个模块之间相互调用耗时的最大值
总结
基于Spring依赖的可视化分析,可以快速大概掌握项目结构的基本情况,同时也能直观地感受代码架构是否符合 低耦合高内聚 的要求,对后续的代码重构优化也有一定的指导作用;在对项目结构有基本的了解后,就可以结合调用链分析,在微服务模块拆分之前,对系统整体的性能指标有确切的数据,也能通过和图表的交互,大致预估微服务模块拆分后的项目结构以及系统性能的变化。
我做这个工具的初衷,是因为职业生涯中,经常遇到空降的大厂架构师之类的人物,在没有充分了解项目现况的情况下,强行推行从别的企业生搬硬套的软件架构,结果往往导致项目进展受阻的情况;而熟悉项目的低级开发人员却没有任何发言权,但凡提出质疑总会被大厂光环的title压制。
这个可视化分析工具可以提供可量化的指标,可以打破领导对大厂经验的迷信,刹住行业的歪风邪气,让行业风气重新回到纯粹的理性探讨技术氛围。
DevOps
- 2018 到 2020 :从 Spring Cloud 到 Cloud Native,再到 Serverless
- 在WSL2上部署标准k8s集群并使用Prometheus监控spring cloud服务
- 通过skaffold快速部署微服务
在WSL2上部署标准k8s集群并使用Prometheus监控spring cloud服务
2019年Windows Build大会上,微软发布
WSL2,意味着开发者们终于可以在Windows上开发和运行原汁原味Linux应用。
本篇文章将教会大家如何在 WSL2 部署一个标准版的 k8s 集群以及使用 Prometheus 和 grafana 监控 spring cloud 服务。
和第一代 WSL不同,WSL2 是运行在 hyper-v 上的一个 VM,因此可以运行原汁原味的 Linux 发行版,例如 Ubuntu,同样对 Linux ABI 接口兼容也更好,支持更多 Linux 应用,例如 docker 。
经过将近一年时间的开发与优化,微软团队终于发布了正式版 WSL2,用户只需将操作系统升级到 2004 以后的 Windows 10 即可。
准备工作
安装 WSL
前置条件:
- 操作系统必须是
Windows 10 build 2004以后的版本 C盘剩余空间最好在64G以上- 内存最好是
16G以上,8g内存运行k8s集群后,就没有剩余内存
安装开始:
- 在桌面左下角
Windows徽标上,右键选择Windows Powershell(管理员)(A),然后运行一下脚本
dism.exe /online /enable-feature /featurename:Microsoft-Windows-Subsystem-Linux /all /norestart
如果这里遇到失败,多半是操作系统没有升到最新版本的
Windows 10或者
- 安装 WSL 2 之前,必须启用“虚拟机平台”可选功能。
dism.exe /online /enable-feature /featurename:VirtualMachinePlatform /all /norestart
-
重新启动计算机,以完成 WSL 安装并更新到 WSL 2。
-
将 WSL 2 设置为默认版本
安装新的 Linux 分发版时,请在 Powershell 中运行以下命令,以将 WSL 2 设置为默认版本:
wsl --set-default-version 2
- 安装所选的 Linux 分发版
打开 Microsoft Store,并选择你偏好的 Linux 分发版。
单击以下链接会打开每个分发版的 Microsoft Store 页面:
- Ubuntu 16.04 LTS
- Ubuntu 18.04 LTS
- Ubuntu 20.04 LTS
- openSUSE Leap 15.1
- SUSE Linux Enterprise Server 12 SP5
- SUSE Linux Enterprise Server 15 SP1
- Kali Linux
- Debian GNU/Linux
- Fedora Remix for WSL
- Pengwin
- Pengwin Enterprise
- Alpine WSL
- 在分发版的页面中,选择“获取”。
- 设置新分发版
首次启动新安装的 Linux 分发版时,将打开一个控制台窗口,系统会要求你等待一分钟或两分钟,以便文件解压缩并存储到电脑上。 未来的所有启动时间应不到一秒。
然后,需要为新的 Linux 分发版创建用户帐户和密码。
将分发版版本设置为 WSL 1 或 WSL 2
可以打开 PowerShell 命令行并输入以下命令(仅在 Windows 内部版本 19041 或更高版本中可用),来检查分配给每个已安装的 Linux 分发版的 WSL 版本:wsl -l -v
wsl --list --verbose
若要将分发版设置为受某一 WSL 版本支持,请运行:
wsl --set-version <distribution name> <versionNumber>
请确保将 <distribution name> 替换为你的分发版的实际名称,并将 <versionNumber> 替换为数字“1”或“2”。 可以随时更改回 WSL 1,方法是运行与上面相同的命令,但将“2”替换为“1”。
此外,如果要使 WSL 2 成为你的默认体系结构,可以通过此命令执行该操作:
wsl --set-default-version 2
这会将安装的任何新分发版的版本设置为 WSL 2。
- 排查安装问题
下面是相关的错误和建议的修复措施。 有关其他常见错误及其解决方法,请参阅 WSL 故障排除页。
- 安装失败并出现错误 0x80070003
- 适用于 Linux 的 Windows 子系统只能在系统驱动器(通常是 C: 驱动器)中运行。 请确保分发版存储在系统驱动器上:
- 打开“设置”->“存储”->“更多存储设置: 更改新内容的保存位置”
- WslRegisterDistribution 失败并出现错误
0x8007019e- 未启用“适用于 Linux 的 Windows 子系统”可选组件:
- 打开“控制面板” -> “程序和功能” -> “打开或关闭 Windows 功能”-> 选中“适用于 Linux 的 Windows 子系统”,或使用本文开头所述的 PowerShell cmdlet。
- 安装失败,出现错误
0x80070003或错误0x80370102- 请确保在计算机的 BIOS 内已启用虚拟化。 有关如何执行此操作的说明因计算机而异,并且很可能在 CPU 相关选项下。
- 尝试升级时出错:
Invalid command line option: wsl --set-version Ubuntu 2- 请确保已启用适用于 Linux 的 Windows 子系统,并且你使用的是 Windows 内部版本 19041 或更高版本。 若要启用 WSL,请在 Powershell 提示符下以具有管理员权限的身份运行此命令:
Enable-WindowsOptionalFeature -Online -FeatureName Microsoft-Windows-Subsystem-Linux。 可在此处找到完整的 WSL 安装说明。
- 请确保已启用适用于 Linux 的 Windows 子系统,并且你使用的是 Windows 内部版本 19041 或更高版本。 若要启用 WSL,请在 Powershell 提示符下以具有管理员权限的身份运行此命令:
- 由于虚拟磁盘系统的某个限制,无法完成所请求的操作。虚拟硬盘文件必须是解压缩的且未加密的,并且不能是稀疏的。
- 请检查 WSL Github 主题 #4103,其中跟踪了此问题以提供更新的信息。
- 无法将词语“wsl”识别为 cmdlet、函数、脚本文件或可运行程序的名称。
- 请确保已安装“适用于 Linux 的 Windows 子系统”可选组件。 此外,如果你使用的是 Arm64 设备,并从 PowerShell 运行此命令,则会收到此错误。 请改为从 PowerShell Core 或从命令提示符运行 wsl.exe。
- 额外工作
-
禁用
swap因为
kubelet不支持swap内存,因此需要通过设置wslconfig禁用swap。在用户根目录创建.wslconfig文件,例如: 'C:\Users\huang' ,添加以下内容:[wsl2] swap=0 # 关闭swap [network] generateResolvConf = false # 解决域名解析失败的问题然后在
powershell或cmd运行以下命令,关闭wsl,再点击开始菜单Ubuntu图标,即完成重启WSL。wsl --shutdown -
设置
/etc/resolve.conf因为每次
WSL启动会自动覆盖/etc/resolve.conf文件,可能会导致域名解析失败的问题,必要时可以设置自定义的DNS服务器,把以下内容追加到/etc/resolve.conf文件末尾:(需要root权限,记得加上sudo)nameserver 8.8.8.8 nameserver 114.114.114.114 -
替换
apt源Ubuntu官方源在国内并不好用,因此我们需要替换源,提高软件安装和更新速度。编辑/etc/apt/sources.list,为了安全可以先备份以下原文件# 备份source.list文件 sudo mv /etc/apt/sources.list /etc/apt/sources.list.bak # 创建source.list文件 sudo vim /etc/apt/sources.list按
i进入编辑模式,然后把以下内容复制粘贴到/etc/apt/sources.list文件这是清华大学
Ubuntu 18.04 LTS的镜像源,可根据用户安装的发行版自行替换# 默认注释了源码镜像以提高 apt update 速度,如有需要可自行取消注释 deb https://mirrors.tuna.tsinghua.edu.cn/ubuntu/ bionic main restricted universe multiverse # deb-src https://mirrors.tuna.tsinghua.edu.cn/ubuntu/ bionic main restricted universe multiverse deb https://mirrors.tuna.tsinghua.edu.cn/ubuntu/ bionic-updates main restricted universe multiverse # deb-src https://mirrors.tuna.tsinghua.edu.cn/ubuntu/ bionic-updates main restricted universe multiverse deb https://mirrors.tuna.tsinghua.edu.cn/ubuntu/ bionic-backports main restricted universe multiverse # deb-src https://mirrors.tuna.tsinghua.edu.cn/ubuntu/ bionic-backports main restricted universe multiverse deb https://mirrors.tuna.tsinghua.edu.cn/ubuntu/ bionic-security main restricted universe multiverse # deb-src https://mirrors.tuna.tsinghua.edu.cn/ubuntu/ bionic-security main restricted universe multiverse # 预发布软件源,不建议启用 # deb https://mirrors.tuna.tsinghua.edu.cn/ubuntu/ bionic-proposed main restricted universe multiverse # deb-src https://mirrors.tuna.tsinghua.edu.cn/ubuntu/ bionic-proposed main restricted universe multiverse deb [arch=amd64] https://download.docker.com/linux/ubuntu bionic stable # deb-src [arch=amd64] https://download.docker.com/linux/ubuntu bionic stable先按
esc,再安装:,输入wq,回车就出退出并保存文件。然后更新本地缓存sudo apt update && sudo apt upgrade -
安装
daemonize很多
Linux应用需要systemd运行,比如说docker和kubelet。但是几乎所有WSL2支持的镜像都不能运行systemd,因此我们需要安装daemonize。apt-get update && sudo apt-get install -yqq daemonize dbus-user-session fontconfig创建
/usr/sbin/start-systemd-namespace文件,并复制粘贴以下内容到文件中#!/bin/bash SYSTEMD_PID=$(ps -ef | grep '/lib/systemd/systemd --system-unit=basic.target$' | grep -v unshare | awk '{print $2}') if [ -z "$SYSTEMD_PID" ] || [ "$SYSTEMD_PID" != "1" ]; then export PRE_NAMESPACE_PATH="$PATH" (set -o posix; set) | \ grep -v "^BASH" | \ grep -v "^DIRSTACK=" | \ grep -v "^EUID=" | \ grep -v "^GROUPS=" | \ grep -v "^HOME=" | \ grep -v "^HOSTNAME=" | \ grep -v "^HOSTTYPE=" | \ grep -v "^IFS='.*"$'\n'"'" | \ grep -v "^LANG=" | \ grep -v "^LOGNAME=" | \ grep -v "^MACHTYPE=" | \ grep -v "^NAME=" | \ grep -v "^OPTERR=" | \ grep -v "^OPTIND=" | \ grep -v "^OSTYPE=" | \ grep -v "^PIPESTATUS=" | \ grep -v "^POSIXLY_CORRECT=" | \ grep -v "^PPID=" | \ grep -v "^PS1=" | \ grep -v "^PS4=" | \ grep -v "^SHELL=" | \ grep -v "^SHELLOPTS=" | \ grep -v "^SHLVL=" | \ grep -v "^SYSTEMD_PID=" | \ grep -v "^UID=" | \ grep -v "^USER=" | \ grep -v "^_=" | \ cat - > "$HOME/.systemd-env" echo "PATH='$PATH'" >> "$HOME/.systemd-env" exec sudo /usr/sbin/enter-systemd-namespace "$BASH_EXECUTION_STRING" fi if [ -n "$PRE_NAMESPACE_PATH" ]; then export PATH="$PRE_NAMESPACE_PATH" fi接着,创建
/usr/sbin/enter-systemd-namespace文件,将以下内容复制粘贴到文件中#!/bin/bash if [ "$UID" != 0 ]; then echo "You need to run $0 through sudo" exit 1 fi SYSTEMD_PID="$(ps -ef | grep '/lib/systemd/systemd --system-unit=basic.target$' | grep -v unshare | awk '{print $2}')" if [ -z "$SYSTEMD_PID" ]; then /usr/sbin/daemonize /usr/bin/unshare --fork --pid --mount-proc /lib/systemd/systemd --system-unit=basic.target while [ -z "$SYSTEMD_PID" ]; do SYSTEMD_PID="$(ps -ef | grep '/lib/systemd/systemd --system-unit=basic.target$' | grep -v unshare | awk '{print $2}')" done fi if [ -n "$SYSTEMD_PID" ] && [ "$SYSTEMD_PID" != "1" ]; then if [ -n "$1" ] && [ "$1" != "bash --login" ] && [ "$1" != "/bin/bash --login" ]; then exec /usr/bin/nsenter -t "$SYSTEMD_PID" -a \ /usr/bin/sudo -H -u "$SUDO_USER" \ /bin/bash -c 'set -a; source "$HOME/.systemd-env"; set +a; exec bash -c '"$(printf "%q" "$@")" else exec /usr/bin/nsenter -t "$SYSTEMD_PID" -a \ /bin/login -p -f "$SUDO_USER" \ $(/bin/cat "$HOME/.systemd-env" | grep -v "^PATH=") fi echo "Existential crisis" fi运行
sudo visudo命令,把以下内容复制粘贴到文件末尾:Defaults env_keep += WSLPATH Defaults env_keep += WSLENV Defaults env_keep += WSL_INTEROP Defaults env_keep += WSL_DISTRO_NAME Defaults env_keep += PRE_NAMESPACE_PATH %sudo ALL=(ALL) NOPASSWD: /usr/sbin/enter-systemd-namespace运行以下命令即添加刚才的
shell脚本到.bashrc:sudo sed -i 2a"# Start or enter a PID namespace in WSL2\nsource /usr/sbin/start-systemd-namespace\n" /etc/bash.bashrc最后,设置
Windows环境变量,用管理员权限打开powershell,运行以下命令:cmd.exe /C setx WSLENV BASH_ENV/u cmd.exe /C setx BASH_ENV /etc/bash.bashrc # 关闭WSL wsl --shutdown点击
开始菜单上的Ubuntu应用,重新打开WSL,正常进入命令行界面说明操作成功。
进入正题
安装 docker
移除旧版本docker
sudo apt-get remove docker docker-engine docker.io containerd runc
安装docker
# 更新软件索引
sudo apt-get update

# 安装必备软件
sudo apt-get install \
    apt-transport-https \
    ca-certificates \
    curl \
    gnupg-agent \
    software-properties-common

# 安装 apt-key
curl -fsSL https://download.docker.com/linux/ubuntu/gpg | sudo apt-key add -

# 添加 repository
sudo add-apt-repository \
   "deb [arch=amd64] https://download.docker.com/linux/ubuntu \
   $(lsb_release -cs) \
   stable"

# 更新软件索引
sudo apt-get update

# 安装docker
sudo apt-get install docker-ce docker-ce-cli containerd.io

# 检验docker是否安装成功
sudo docker run hello-world
配置 docker
使用 root 权限创建 '/etc/docker/daemon.json' 文件,并填写以下内容:
{
  "exec-opts": ["native.cgroupdriver=systemd"],
  "log-driver": "json-file",
  "log-opts": {
    "max-size": "100m"
  },
  "storage-driver": "overlay2",
  "registry-mirrors": ["https://docker.mirrors.ustc.edu.cn/"]
}
重启 docker
sudo systemctl daemon-reload
sudo systemctl start docker
安装 kubernetes
添加 apt-key.gpg 步骤可能需要梯子,可以通过手动下载 apt-key.gpg,再用这个命令 cat /mnt/c/Users/huang/Downloads/apt-key.gpg | sudo apt-key add - ,/mnt/c/ 表示挂载 C盘,后面加上 apt-key.gpg 所在目录
sudo apt-get update && sudo apt-get install -y apt-transport-https curl
# 添加apt-key.gpg步骤可能需要梯子
curl -s https://packages.cloud.google.com/apt/doc/apt-key.gpg | sudo apt-key add -
cat <<EOF | sudo tee /etc/apt/sources.list.d/kubernetes.list
deb https://apt.kubernetes.io/ kubernetes-xenial main
EOF
sudo apt-get update
sudo apt-get install -y kubelet kubeadm kubectl
sudo apt-mark hold kubelet kubeadm kubectl
启动 k8s集群
执行 kubeadm init 命令之前,先下载必要的镜像,运行以下命令:
kubeadm config images list
得到以下结果:(冒号后面是镜像的版本,会根据kubeadm版本而变化)
k8s.gcr.io/kube-apiserver:v1.18.5
k8s.gcr.io/kube-controller-manager:v1.18.5
k8s.gcr.io/kube-scheduler:v1.18.5
k8s.gcr.io/kube-proxy:v1.18.5
k8s.gcr.io/pause:3.2
k8s.gcr.io/etcd:3.4.3-0
k8s.gcr.io/coredns:1.6.7
k8s.gcr.io 镜像在国内多半是拉取失败的,所以要把 k8s.gcr.io 前缀换成 gotok8s ,再加上 'docker pull':
docker pull gotok8s/kube-apiserver:v1.18.5
docker pull gotok8s/kube-controller-manager:v1.18.5
docker pull gotok8s/kube-scheduler:v1.18.5
docker pull gotok8s/kube-proxy:v1.18.5
docker pull gotok8s/pause:3.2
docker pull gotok8s/etcd:3.4.3-0
docker pull gotok8s/coredns:1.6.7
逐行执行以上命令,待全部完成后,再通过 docker tag 命令,把镜像标签改成 k8s.gcr.io:
docker tag gotok8s/kube-apiserver:v1.18.5 k8s.gcr.io/kube-apiserver:v1.18.5
docker tag gotok8s/kube-controller-manager:v1.18.5 k8s.gcr.io/kube-controller-manager:v1.18.5
docker tag gotok8s/kube-scheduler:v1.18.5 k8s.gcr.io/kube-scheduler:v1.18.5
docker tag gotok8s/kube-proxy:v1.18.5 k8s.gcr.io/kube-proxy:v1.18.5
docker tag gotok8s/pause:3.2 k8s.gcr.io/pause:3.2
docker tag gotok8s/etcd:3.4.3-0 k8s.gcr.io/etcd:3.4.3-0
docker tag gotok8s/coredns:1.6.7 k8s.gcr.io/coredns:1.6.7
再执行以下命令,等待数分钟后,即可搭建一个标准版 k8s 集群
sudo kubeadm init --pod-network-cidr=10.244.0.0/16
出现以下命令时,说明创建 k8s 集群成功,再按照提示执行以下命令:(如果创建集群失败,通过运行 sudo kubeadm reset,然后输入 Y 即可清除 kubeadm init 命令的操作)
mkdir -p $HOME/.kube
sudo cp -i /etc/kubernetes/admin.conf $HOME/.kube/config
sudo chown $(id -u):$(id -g) $HOME/.kube/config
最后一步,通过 kubectl apply 命令,安装 CNI 插件,这里以 calico 为例:
kubectl apply -f https://docs.projectcalico.org/v3.14/manifests/calico.yaml
通过 kubectl get node 命令获取 node 节点的状态是否 ready:
NAME              STATUS   ROLES    AGE     VERSION
desktop-v6hkp49   Ready    master   2m24s   v1.18.5
压轴环节
部署 spring cloud 集群
这里 spring cloud 示例源码是本人18年学习 spring cloud的demo,相关代码已经上传到 Github
下载源码构建
git clone https://github.com/zaoying/datacenter.git
使用其他编程语言的项目也是可以的,只需要加上
prometheus对应的sdk
以 Spring Boot 为例,pom.xml 文件添加 ``
<project

	<properties>
    ...
    <!-- 使用tomcat作为servlet容器,请确保版本在8.5.32 以上 -->
		<tomcat.version>8.5.32</tomcat.version>
    ...
	</properties>>
  ...
	<dependencies>
    ...
		<!-- Micrometer Prometheus registry  -->
		<dependency>
			<groupId>io.micrometer</groupId>
			<artifactId>micrometer-registry-prometheus</artifactId>
		</dependency>
    ...
	</dependencies>
</project>
修改配置文件 application.yml,增加以下内容:
management:
  endpoints:
    web:
      exposure:
        include: "*"
    health:
      show-details: always
  metrics:
    tags:
      application: ${spring.application.name}
建议把 eureka 以及其他微服务组件的镜像写到同一个 Pod 中运行,各组件直接就可以通过 localhost 直接进行通信
使用 maven 打包成jar
maven 环境的搭建不细说,以下命令可以在 Windows 上运行
# 切换到 datacenter 所在目录
cd datacenter

# 构建并打包eureka
cd eureka
mvn package -Dmaven.test.skip=true

# 构建并打包school
cd school
mvn package -Dmaven.test.skip=true

# 构建并打包teacher
cd teacher
mvn package -Dmaven.test.skip=true

# 构建并打包student
cd student
mvn package -Dmaven.test.skip=true
使用 docker 打包镜像
这里使用 WSL2 里面安装的 docker 打包镜像。假设项目所在路径是 c:/Users/huang/Documents/github。
eureka、school、teacher 和 student 目录下都写好 Dockerfile,以 eureka 为例:
FROM openjdk:8u242-jre-slim
COPY target/eureka-0.0.1-SNAPSHOT.jar ./app.jar
CMD java -jar app.jar
其他微服务模块的 Dockerfile 也类似,把 eureka-0.0.1-SNAPSHOT.jar 替换成 xxx-0.0.1-SNAPSHOT.jar 即可,xxx 就是微服务模块的名称。
把 Dockerfile 都编写完成后,运行以下命令打包 Docker 镜像
# 打包eureka镜像
docker build -t datacenter-eureka:latest /mnt/c/Users/huang/Documents/github/datacenter/eureka

# 打包school镜像
docker build -t datacenter-school:latest /mnt/c/Users/huang/Documents/github/datacenter/school

# 打包teacher镜像
docker build -t datacenter-teacher:latest /mnt/c/Users/huang/Documents/github/datacenter/teacher

# 打包student镜像
docker build -t datacenter-student:latest /mnt/c/Users/huang/Documents/github/datacenter/student
部署并初始化 mysql
为了方便管理,先创建一个新的 namespace,名字就叫 spring-cloud:
kubectl create namespace spring-cloud
mysql 有官方镜像,直接拿过来使用即可,不用重新打包。另外因为 mysql 是个有状态应用,为了避免Pod重启导致数据丢失,所以在运行之前,需要先分配一个 Persistent Volume 和 Persistent Volume Claim:
kind: PersistentVolume
apiVersion: v1
metadata:
  name: mysql-pv-volume
  namespace: spring-cloud
  labels:
    type: local
spec:
  storageClassName: manual
  capacity:
    storage: 2Gi
  accessModes:
    - ReadWriteOnce
  hostPath:
    path: "/opt/data/mysql"
---
apiVersion: v1
kind: PersistentVolumeClaim
metadata:
  name: mysql-pv-claim
  namespace: spring-cloud
spec:
  storageClassName: manual
  accessModes:
    - ReadWriteOnce
  resources:
    requests:
      storage: 2Gi
可以根据实际情况,把
/opt/data/mysql换成其他目录,PV和PVC的大小也可以调整为其他大小,就目前的demo而已,2Gi容量已经足够了。
将上述内容保存到 pvc.yml 文件,然后执行 kubectl apply -f 命令创建:
kubectl apply -f pvc.yml
接下来,创建 mysql.yml 文件,再将以下内容添加到文件内:
apiVersion: v1
kind: Service
metadata:
  name: mysql
  namespace: spring-cloud
spec:
  type: NodePort
  ports:
  - name: mysql
    protocol: TCP
    nodePort: 30306
    port: 3306
    targetPort: 3306
  selector:
    app: mysql
---
apiVersion: apps/v1
kind: Deployment
metadata:
  name: mysql
  namespace: spring-cloud
spec:
  selector:
    matchLabels:
      app: mysql
  strategy:
    type: Recreate
  template:
    metadata:
      labels:
        app: mysql
    spec:
      containers:
      - image: mysql:5.6
        name: mysql
        env:
          # Use secret in real usage
        - name: MYSQL_ROOT_PASSWORD
          value: bocloud@2019
        ports:
        - containerPort: 3306
          name: mysql
        volumeMounts:
        - name: mysql-persistent-storage
          mountPath: /var/lib/mysql
      volumes:
      - name: mysql-persistent-storage
        persistentVolumeClaim:
          claimName: mysql-pv-claim
还是通过 kubectl apply -f 命令创建 mysql 的 service 和 deployment, 然后同一个 namespace 即 spring-cloud 命令空间的 Pod 就可以通过 mysql:3306 地址访问 mysql。
kubectl apply -f mysql.yml
通过 kubectl get pod -n spring-cloud 命令,查看 pod 是否 running
NAME                              READY   STATUS    RESTARTS   AGE
mysql-85bcfd68f6-qxmcj            0/1     Pending   0          4m59s
使用 kubectl descibe pod mysql-85bcfd68f6-qxmcj -n spring-cloud 查看,发现以下原因:
Events:
  Type     Reason            Age                 From               Message
  ----     ------            ----                ----               -------
  Warning  FailedScheduling  14s (x4 over 104s)  default-scheduler  0/1 nodes are available: 1 node(s) had taint {node-role.kubernetes.io/master: }, that the pod didn't tolerate.
说明 pod 不能在控制面 control panel 运行,可以通过以下命令解决:
kubectl taint nodes --all node-role.kubernetes.io/master-
编写 datacenter.yml 并部署
创建 datacenter.yml 文件,并把以下内容添加到文件内:
apiVersion: v1
kind: Service
metadata:
  name: datacenter
  namespace: spring-cloud
spec:
  ports:
    - name: eureka
      protocol: TCP
      port: 8761
      targetPort: 8761
      nodePort: 30761
    - name: school
      protocol: TCP
      port: 8084
      targetPort: 8084
      nodePort: 30084
    - name: teacher
      protocol: TCP
      port: 8082
      targetPort: 8082
      nodePort: 30082
    - name: student
      protocol: TCP
      port: 8083
      targetPort: 8083
      nodePort: 30083
  selector:
    app: datacenter
  type: NodePort
---
apiVersion: apps/v1
kind: Deployment
metadata:
  name: datacenter-dep
  namespace: spring-cloud
  labels:
    app: datacenter
spec:
  replicas: 1
  selector:
    matchLabels:
      app: datacenter
  template:
    metadata:
      labels:
        app: datacenter
    spec:
      containers:
      - name: eureka
        image: datacenter-eureka:latest
        imagePullPolicy: IfNotPresent
        ports:
        - containerPort: 8761
      - name: school
        image: datacenter-school:latest
        imagePullPolicy: IfNotPresent
        env:
        - name: MYSQL_ADDRESS
          value: mysql:3306
        - name: MYSQL_PASSWORD
          value: bocloud@2019
        ports:
        - containerPort: 8084
      - name: teacher
        image: datacenter-teacher:latest
        imagePullPolicy: IfNotPresent
        env:
        - name: MYSQL_ADDRESS
          value: mysql:3306
        - name: MYSQL_PASSWORD
          value: bocloud@2019
        ports:
        - containerPort: 8082
      - name: student
        image: datacenter-student:latest
        imagePullPolicy: IfNotPresent
        env:
        - name: MYSQL_ADDRESS
          value: mysql:3306
        - name: MYSQL_PASSWORD
          value: bocloud@2019
        ports:
        - containerPort: 8083
运行以下命令,即可创建 datacenter 的 service 和 deployment,同一个 namespace 的 Pod 可以通过 datacenter:8761、datacenter:8084、datacenter:8082、datacenter:8083 来分别访问 eureka、school、teacher 和 student 服务。
kubectl apply -f pvc.yml
部署 prometheus 和 grafana
为了方便管理,先创建 prometheus-k8s 的 namespace
kubectl create namespace prometheus-k8s
然后,再创建一个 configmap 来保存 prometheus 的配置:
# my global config
global:
  scrape_interval:     15s # Set the scrape interval to every 15 seconds. Default is every 1 minute.
  evaluation_interval: 15s # Evaluate rules every 15 seconds. The default is every 1 minute.
  # scrape_timeout is set to the global default (10s).

# Alertmanager configuration
alerting:
  alertmanagers:
  - static_configs:
    - targets:
      # - alertmanager:9093

# Load rules once and periodically evaluate them according to the global 'evaluation_interval'.
rule_files:
  # - "first_rules.yml"
  # - "second_rules.yml"

# A scrape configuration containing exactly one endpoint to scrape:
# Here it's Prometheus itself.
scrape_configs:
  # The job name is added as a label `job=<job_name>` to any timeseries scraped from this config.
  - job_name: 'prometheus'

    # metrics_path defaults to '/metrics'
    # scheme defaults to 'http'.

    static_configs:
    - targets: ['localhost:9090']
  - job_name: 'school'
    metrics_path: "/actuator/prometheus"
    static_configs:
    - targets: ['datacenter.spring-cloud:8084']
  - job_name: 'teacher'
    metrics_path: "/actuator/prometheus"
    static_configs:
    - targets: ['datacenter.spring-cloud:8082']
  - job_name: 'student'
    metrics_path: "/actuator/prometheus"
    static_configs:
    - targets: ['datacenter.spring-cloud:8083']
然后把文件保存为 prometheus.yml,再运行以下命令:
kubectl create configmap prometheus-config -n prometheus-k8s --from-file prometheus.yml
接着,创建 prometheus 的 service 和 deployment :
apiVersion: v1
kind: Service
metadata:
  name: prometheus
  namespace: prometheus-k8s
spec:
  type: NodePort
  ports:
  - name: http
    protocol: TCP
    nodePort: 30909
    port: 9090
    targetPort: 9090
  selector:
    app: prometheus
---
apiVersion: apps/v1
kind: Deployment
metadata:
  name: prometheus
  namespace: prometheus-k8s
spec:
  selector:
    matchLabels:
      app: prometheus
  strategy:
    type: Recreate
  template:
    metadata:
      labels:
        app: prometheus
    spec:
      containers:
      - image: prom/prometheus
        name: prometheus
        imagePullPolicy: IfNotPresent
        ports:
        - containerPort: 9090
          name: http
        volumeMounts:
        - name: prometheus-config
          mountPath: /etc/prometheus/
      volumes:
      - name: prometheus-config
        configMap:
          name: prometheus-config
          items:
           - key: prometheus.yml
             path: prometheus.yml
把上述内容保存为 serviceAndDeployment.yml 文件,再运行以下命令:
kubectl apply -f serviceAndDeployment.yml
接着,创建 grafana 的 service 和 deployment :
apiVersion: v1
kind: Service
metadata:
  name: grafana
  namespace: prometheus-k8s
spec:
  type: NodePort
  ports:
  - name: http
    protocol: TCP
    nodePort: 30009
    port: 3000
    targetPort: 3000
  selector:
    app: grafana
---
apiVersion: apps/v1
kind: Deployment
metadata:
  name: grafana
  namespace: prometheus-k8s
spec:
  selector:
    matchLabels:
      app: grafana
  strategy:
    type: Recreate
  template:
    metadata:
      labels:
        app: grafana
    spec:
      containers:
      - image: grafana/grafana
        name: grafana
        imagePullPolicy: IfNotPresent
        ports:
        - containerPort: 3000
          name: http
把上述内容保存为 serviceAndDeployment-grafana.yml 文件,再运行以下命令:
kubectl apply -f serviceAndDeployment-grafana.yml
创建 ingress
创建 ingress-nginx-controller,这里用到 hostNetwork,所以会占用宿主机的 80 和 443 端口
kubectl apply -f https://raw.githubusercontent.com/zaoying/k8s-learning/master/nginx/mandatory.yaml
创建 ingress-nginx 服务
kind: Service
apiVersion: v1
metadata:
  name: ingress-nginx
  namespace: ingress-nginx
  labels:
    app.kubernetes.io/name: ingress-nginx
    app.kubernetes.io/part-of: ingress-nginx
spec:
  externalTrafficPolicy: Local
  type: NodePort
  selector:
    app.kubernetes.io/name: ingress-nginx
    app.kubernetes.io/part-of: ingress-nginx
  ports:
    - name: http
      port: 80
      protocol: TCP
      targetPort: http
    - name: https
      port: 443
      protocol: TCP
      targetPort: https
把以上内容保存为 service-node-port.yml,再运行 kubectl apply -f service-node-port.yml 。
接着为 grafana 创建 tls secret,信息可以随便填
openssl genrsa -aes128 -out server.key 2048

openssl req -newkey rsa:2048 -nodes -keyout server.key -x509 -days 3650 -out server.crt

kubectl create secret tls prometheus-secret-tls --cert=server.crt --key=server.key -n prometheus-k8s
把以下内容保存到 ingress.yml,再运行 kubectl apply -f ingress.yml
apiVersion: extensions/v1beta1
kind: Ingress
metadata:
  name: grafana
  namespace: prometheus-k8s
  annotations:
    nginx.ingress.kubernetes.io/ingress.class: nginx
spec:
  tls:
  - hosts:
    - grafana.local
    secretName: prometheus-secret-tls
  rules:
  - host: grafana.local
    http:
      paths:
      - path: /
        backend:
          serviceName: grafana
          servicePort: 3000
把 127.0.0.1 grafana.local 追加到 C:\Windows\System32\drivers\etc\hosts 文件末。
配置 grafana
- 在浏览器打开
https://grafana.local就可以看到grafana网页,因为是自签名tls证书,所以浏览器会警告,忽略警告。

- 输入
admin/admin登录,然后修改密码
- 点击
Add your first data source,选择prometheus,填写http://prometheus:9090,然后点击Save & Test保存。
- 点击
+,选择import,输入4701,点击Load
prometheus列选择 prometheus, 然后点击import
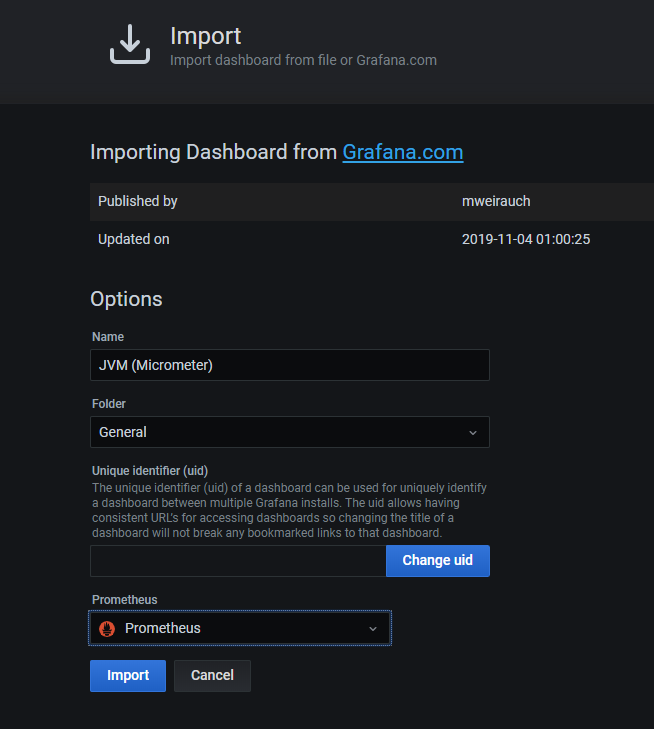
- 重复步骤
4-5,把4701换成6756
至此,本教程结束!
参考文章:
Running Snaps on WSL2 (Insiders only for now)
Install Docker Engine on Ubuntu
Creating a single control-plane cluster with kubeadm
2018 到 2020 :从 Spring Cloud 到 Cloud Native,再到 Serverless
2018:Spring Cloud 的崛起
2018年刚开始接触 sprig cloud 的时候,还不知道 分布式计算 的概念,只知道 Netflix 开源了一套 微服务框架,里面有很多组件组成:
| 组件名称 | 作用 |
|---|---|
| eureka | 服务注册与发现 |
| zuul | 网关路由、反向代理 |
| feign | 客户端侧负载均衡 |
| hystrix | 熔断降级 |
| seluth & zipkin | 链路追踪 |
| config | 配置管理 |
| ... | ....... |
当时按照书上所教的,搭建一个微服务 demo ,就以为 微服务 不过如此。兴冲冲跑去面试,结果遇到一个阿里出来的大佬,他说“只会问你懂的东西,不会问我懂你不懂的东西”,结果就被大佬问到 分布式锁、分布式事务 和 分布式任务调度 要怎么解决?问得我哑口无言,只能灰溜溜地回去。。。
后面经过多番的学习,才知道 分布式计算 是个非常庞大的体系,spring cloud 这套微服务开发框架所包含的知识点只不过是很小的一部分。说到 分布式计算 ,就不得不提 拜占庭将军问题,业界基于这套理论衍生出很多组件:
| 中间件名称 | 作用 |
|---|---|
| redis | 分布式锁 |
| zookeeper | 分布式锁/同步 |
| RocketMQ | 分布式事务 |
| xxl-job | 分布式任务调度 |
| elastic-job | 分布式任务调度 |
| ... | ....... |
说了这么多,事实上只涵盖 分布式计算 很小的一部分,但对于一个普通的 Java Web 开发人员来说,掌握这点知识点已经足够他在北上广深拿一两万工资,过过普通日子。
然而即便如此,在实际的开发流程中,Spring Cloud 这套框架还是暴露出它的致命弱点:
- 侵入性非常强
- 不支持异构应用
首先说说 Spring Cloud 侵入性的一面,强侵入性导致了在将以前单体应用改造为模块化的微服务遇到非常多的麻烦,其中最大的问题是 微服务化改造 过程非常耗时耗力,却没有给公司带来任何短期收益,而且占用原本的产品研发的人力物力。面对这种情况,一般的公司都会选择一边交付新功能,一边改造旧服务的策略。
其次,说起 异构应用,不得不说“明日黄花” PHP 和 “后起之秀” NodeJS。
过去很多公司会采用 PHP 开发 Web应用 ,然而随着 NodeJS 不断崛起,业界流行起 前后端分离 浪潮,PHP 生态虽然受到一定的冲击,但不致命。
然而,一波未平一波又起,业界又兴起 微服务化 的浪潮,不同于以前的是,这次 PHP 彻底掉队了。
之前我在面试的时候,遇到一个唯品会出来的10年开发经验的 PHP 程序员。听他说,前几年公司招了一个技术老总,中层管理大换血,公司的主要技术栈也从 PHP 转向 Java ,他也转向 Java 开发,然而还是逃不过被裁员的命运。。。
这里脑洞大开一下:如果 Spring Cloud 支持 异构应用,或许 唯品会 就不需要付出巨大代价用 Java 重写 PHP 应用,PHP 程序员也不用面临大规模裁员的困境。
Spring Cloud 不支持 异构应用 这一特点,就是一把双刃剑,虽然干掉宿敌 PHP,但并不代表 Java 开发人员就可以高枕无忧。
Spring Cloud 的高光时刻已经过去了,黑暗即将来临:先是 Eureka 和 Zuul 闭源,后面虽然有 Nacos 和 Gateway等代替品,但依旧没解决 侵入性强 和 不支持异构应用 的致命缺陷。
因此面对即将来临的 云原生时代,Java 根本就没有准备好!
2019:云原生时代的曙光
过去的 2019年 可以说是 云原生 元年。
这一年里,Kubernetes 击败了 Docker Swarm、Docker Compose 和 Mesos 等一众对手,坐稳 容器编排 的 第一把交椅
这一年里,Istio 击败了 对手 Linkerd,成为 Service Mesh 的一哥,剑指曾经的大佬 Spring Cloud,大有取而代之的趋势。
说起 Istio 不得不提 Service Mesh,Service Mesh 中文意思就是 服务网格。而在谈之前,还需要讨论一下 Docker。
早在 2015 年,我就听说 Docker 的大名。那时候我还在上大学,每次因为课程作业或毕业设计的缘故需要安装数据库,而 SQL Server 和 MySQL 两者经常发生冲突,每次冲突都只能通过重装系统解决,每个学期重装一次系统都是家常便饭。虽然想过装虚拟机,但那个时候的固态硬盘和内存都特别贵,装完虚拟机后就卡得要死。
当听到 Docker 的时候,我就想用它来代替虚拟机,然而 Docker 并不支持 Windows,还需要安装 Linux 虚拟机才行,所以后面就不了了之。
我敢打包票,即便到了现在依然很多人就跟当年的我一样认为 Docker 就是一个轻量级的虚拟机,所以在 容器 里运行 MySQL 性能会远低于 原生 Mysql,这其实是一个天大的 误会 !
然而,即便到了 2019 年,Docker 已经支持 Windows 容器,我终于可以运行 容器化 的 SQL Server, 然而在 Windows 上运行 Docker 还是需要安装一个轻量级 Linux 虚拟机。
原因就是 Docker 运行容器的时候,容器之间需要 共享 宿主OS,所以没有 Linux 虚拟机,根本跑不了 Linux 容器。
那么在 Windows 上运行 Windows容器 是不是就不用安装 Linux?答案是并没有。原因是 docker 在运行时需要运行守护进程 docker daemon等监控维持容器运行的组件,所以还是需要运行 Linux 虚拟机。
连以兼容 类Unix 著称的 Mac OS,在运行 docker 的时候,都必须安装虚拟化软件 Virtual Box,更遑论 以封闭著称的Windows。
好了,聊太多题外话,现在回归正题。
在实践 spring cloud 和 docker 的微服务框架时,最常见的问题,无非就是用 docker 部署 eureka 集群,经常遇到 注册中心 和 微服务 组件网络不通的问题。
这时候,见多识广的人会提议使用 compose 或 swarm 来部署,这不过是还抱有 Docker 是虚拟机那种错误认识的人的无奈之举。
随着微服务数量的不断增多,单纯的手工部署和功能羸弱的 compose 和 swarm 已经无法胜任越来越复杂的容器编排工作。
这时候,体量稍微大一点的公司都会招聘专业的运维来搞定容器编排的事情,就轮到 kubernetes 闪亮登场了。
许多连 docker 都没整利索的开发人员,一看到 kubernets 就心里发虚,这就又是个什么玩意?
但公司新来的技术总监,又给老总吹嘘:硅谷的互联网巨头都开始使用 DevOps 模式来管理研发,它可以缩短产品的迭代周期,提高公司竞争力等等。
老总听完,说开发整了个 Spring Cloud 之后,天天搞重构,产品研发进度严重滞后,你就别给我添乱了。
技术总监是何等人物? 只见他眉头一挑,说道:Spring Cloud已经落伍了,改用Istio,就不用重构以前的 PHP 项目,新出的 NodeJS 也支持。
老总被说服了,反正现在被 Spring Cloud 整得不上不下的,就死马当做活马医吧。
于是,公司上下一下子又活跃起来:开口 流水线,闭口 滚动升级。
那么,k8s究竟是何方神圣?下面我就拿 K8S 以及 Istio 的概念和 Spring Cloud对比一下:
| k8s概念 | spring cloud概念 | 功能 |
|---|---|---|
| pod | container | 部署的基本单位 |
| service | eureka | 服务注册与发现 |
| ingress | zuul | 网关路由、反向代理 |
| dns server | feign | 负载均衡 |
| config map | config | 配置管理 |
| istio envoy | hystrix | 熔断降级 |
| istio envoy | seluth & zipkin | 链路追踪 |
| deployment | 灾备扩容 | |
| StatefullSet | 有状态集群 |
以上的比较并不充分体现两者的差异,也不完全准确,仅供参考。
到这里,基本上就是大多数人公司和开发掉进坑里的地方。Istio 虽然好,但如何落地依然是很多人心头的一块大石。
2020 Serverless 后浪
前面提到, 2019年很多公司刚从 Spring Cloud 的坑里爬出来,又遇到 Istio 的这个拦路虎。
然而,时代的滚轮不断向前,不会因为任何一个人或者组织团体而停下
营销大师 马云 提出 中台 就是 云原生 的终极形态,忽悠了一大批互联网企业的高管。一时间,中台 成为互联网行业的 皇帝新衣,问谁都说知道 中台 是什么,但深究起来,却没几个人能准确回答上来。
后面大佬们回过神来,原来 中台 就是 云原生时代 的 应用商店 。不愧是互联网界的忽悠大师!
随之而来,还有 边缘计算,折腾大半年得出一个由 K8S 阉割而来的 K3S,美其名曰 轻量级K8S。
2020开年就是一场突如其来的疫情,转眼间 2020年 已经过了大半,互联网行业能炒作的噱头都炒完了,只剩下 Serverless 这个后浪还能坚持到最后。
Serverless 出来到现在,都跟 中台 概念一样,人人都在谈,但没有人能够准确地说 Serverless 到底是什么,直到后起之秀 NodeJS祭出终极大杀招 WASM,一时间几乎所有语言生态都想分一杯羹。纷纷放出将自家的 WASM转换 工具,亚马逊也宣布旗下开源的 Serverless 运行时 firecracker 支持 WASM。
至此,业界才知道谁才是真正的 后浪 。
通过skaffold快速部署微服务
随着技术的不断发展,程序员们熟悉的传统单体应用开发流程,渐渐地无法适应当下微服务化的潮流趋势。同时随着云原生开发的理念不断推广,越来越多的服务运行在不可变的基础设施之上,随之而来的是传统单体应用开发流程与云化程度日益加深服务之间的隔阂越发巨大,开发人员越来越难以容忍重复繁琐且容易出错的低效率开发流程。因此,一款面向开发人员而运维实施人员的持续构建与持续部署工具
skaffold应运而生
skaffold简介
skaffold 是一款 Google 推出的持续构建与持续部署工具,它主要面向开发人员而非运维实施人员,目标是打破本地开发与云化部署之间的隔阂,减轻开发人员的心智负担,帮助开发人员专注于出色地完成日常开发工作,避免开发人员在纷乱繁杂的运维流程中过多消耗宝贵的精力与时间。
基本架构
skaffold 的工作流按照开发流程的不同阶段,分为4个部分组成:
- 本地开发(文件同步)
- 持续构建
- 持续测试
- 持续部署
以上四个部分均可以根据实际需求进行定制化修改。
本地开发
skaffold 对主流的编程语言以及配套使用的技术栈都有着非常不错的支持,例如 Go 、Java、JavaScript 等
本地开发的核心内容是 文件同步,文件同步的监听对象大概可以分为 源代码 和 编译产物 。
skaffold 官方的推荐做法是监听源代码变动,然后自动化把源代码复制到Docker容器中进行编译和构建。
这种做法的问题不少,首先是源代码变动非常频繁,而编译和构建过程往往非常耗时,因此自动触发构建不太合理。
其次,在Docker容器中编译和构建,需要掌握编写 Multi Stage Dockerfile 技能,否则构建出来的镜像大小会占据非常大的空间,另外还要消耗本就不宽裕的带宽进行镜像传输。
最后,在Docker容器中编译和构建,要解决环境变量,代理设置、缓存构建中间结果等一系列问题,对新手非常不友好。
因此,个人推荐,在本地开发环节尽量采用手动触发编译构建,通过监听编译产物的方式来触发热更新等流程。
持续构建
因为选择手动触发编译,所以本环节的内容主要讲述如何打包镜像的内容
目前 skaffold 官方支持的构建方式有三种:Docker、Jib(maven/gradle)、Bazel
- Docker
- Jib(maven/gradle)
- Bazel
这里以最常见 Docker 为例:
build:
  local:
    push: false                        # 镜像打包成功后是否推送到远端的镜像仓库
  artifacts:                           # 支持打包多个不同组件的镜像
    - image: datacenter-eureka         # 打包后的镜像名称
      context: "eureka"                # Dockerfile相对路径,就放在eureka目录下
      docker:
        dockerfile: Dockerfile
    - image: datacenter-school         # 打包后的镜像名称
      context: "school"                # Dockerfile相对路径
      docker:
        dockerfile: Dockerfile
    - image: datacenter-teacher        # 打包后的镜像名称
      context: "teacher"               # Dockerfile相对路径
      docker:
        dockerfile: Dockerfile
    - image: datacenter-student        # 打包后的镜像名称
      context: "student"               # Dockerfile相对路径
      docker:
        dockerfile: Dockerfile
当运行 skaffold dev 时,会按照 编译 —> 构建 -> 测试 -> 部署 的标准流程走一遍。
当监听到指定路径下的文件发生变化时,skaffold工具会尝试通过类似于 kubectl cp 命令的方式,直接把产生变化后的文件拷贝到运行中的容器内部,避免重新走一遍编译构建/上传镜像的步骤,减少同步代码更改而消耗的时间。
需要特别注意,这种方式对于支持 代码热更新 的技术栈非常实用,例如 Java 和 Javascript,但对于 Go 这类不支持 热更新 的技术栈来说效果十分有限,因为即便文件同步完成,依然重启主进程才能让修改后的功能生效。
接着说 Jib(maven/gradle) ,Jib 也是由谷歌开发的一款专门针对 Java 生态的 CI/CD 工具,跟 skaffold 通用 CI/CD 不同,同时还有 VSCode 和 IDEA 插件, 但作者本人并没有用过,所以等以后有机会再展开讲。
至于 Bazel 是微软开发的全平台构建工具,主要支持 C# 语言,甚至连前端相关 Javascript 项目也可以使用,但缺点就是非常笨重,这里也不展开讲。
此外, skaffold 还支持 Customize 自定义构建,这个方式的构建更自由可控,比如有些 WSL 环境的用户不愿意为了安装 Docker 环境而反复折腾,甚至有些企业内部不允许员工在开发电脑安装虚拟机等等,通过自定义构建流程都可以解决,放到文章最后再详细讲解。
持续测试
skaffold 官方的测试方案是把代码拷贝到定制化的测试环境容器中执行测试用例,这种方法非常麻烦,测试相关的内容这里就不展开讲。
感兴趣的读者可以查看 skaffold官方配置文档
持续部署
skaffold 官方支持的部署方式有很多种,这里以 helm 为例:
deploy:
  helm:
    releases:
    - name: datacenter
      chartPath: package
      artifactOverrides:
        image:
          eureka: datacenter-eureka      # 镜像名称要跟前面构建环节的镜像名称保持一致,但不能出现镜像标签
          school: datacenter-school      # 镜像名称要跟前面构建环节的镜像名称保持一致,但不能出现镜像标签
          teacher: datacenter-teacher    # 镜像名称要跟前面构建环节的镜像名称保持一致,但不能出现镜像标签
          student: datacenter-student    # 镜像名称要跟前面构建环节的镜像名称保持一致,但不能出现镜像标签
      imageStrategy:
        helm: {}
配置参考
完整的配置文件可以参考:datacenter
上手实践
前期准备
点击上述两个组件的链接,下载到本地,再讲二进制加入 PATH 环境变量,详细安装过程不再赘述。
基本开发环境配置
像 JDK 、maven 或 Gradle 这类Java开发必备的工具请自行安装,这里就不展开讲了。
初始化helm chart
在一个空白目录下运行 helm create datacenter 命令,即可快速创建 chart 包,包的目录结构如下所示:
├── Chart.yaml
├── charts
├── templates
│   ├── NOTES.txt
│   ├── _helpers.tpl
│   ├── deployment.yaml
│   ├── hpa.yaml
│   ├── ingress.yaml
│   ├── service.yaml
│   ├── serviceaccount.yaml
│   └── tests
│       └── test-connection.yaml
└── values.yaml
可以根据自身的实际需求,增删修改包的文件内容,例如这里用不到 hpa.yaml 、 serviceaccount.yaml 和 tests/* ,所以都删除了。
然后把 datacenter 重命名为 package ,然后移动到原本的代码目录下,这是约定成俗的习惯。
部署MySQL服务
经典的Web应用往往离不开数据库,而在k8s上运行数据库,则需要提供持久化存储,否则数据库的容器重启后数据就丢失了。
首先,在 package/templates 目录下创建 pv.yaml 文件,然后写入以下内容:
kind: PersistentVolume
apiVersion: v1
metadata:
  name: mysql-pv-volume
  namespace: spring-cloud
  labels:
    type: local
spec:
  storageClassName: manual
  capacity:
    storage: 2Gi
  accessModes:
    - ReadWriteOnce
  hostPath:
    path: "/opt/data/mysql"
解释:创建持久化卷 PersistentVolume ,简称 PV,存储路径就用宿主机目录 /opt/data/mysql
然后,在同一个目录下创建 pvc.yaml 文件,然后写入以下内容:
apiVersion: v1
kind: PersistentVolumeClaim
metadata:
  name: mysql-pv-claim
  namespace: spring-cloud
spec:
  storageClassName: manual
  accessModes:
    - ReadWriteOnce
  resources:
    requests:
      storage: 2Gi
解释:创建持久卷使用声明 PersistentVolumeClaim ,简称 PVC,绑定前面创建的 PV。
PVC 的容量是 2G ,必须小或等于 PV 的容量,否则无法绑定,可以根据实际情况调整容量大小。
为了防止卸载过程中意外删除PV卷导致数据丢失的情况,helm不会执行删除 PV 的操作,必须要用户手动执行。 因此如果部署过程出现PVC与PV无法绑定而导致无法继续的情况,请手动删除再重新PV以及PVC的方式排除故障
最后,在同一个目录下创建 statefulset.yaml 文件,然后写入以下内容:
apiVersion: v1
kind: Service
metadata:
  name: mysql                  # 同一个命名空间的其他服务可以通过域名 “mysql” 来访问 MySQL 服务
  namespace: spring-cloud      # 通过命名空间来隔离不同的项目
spec:
  type: ClusterIP
  ports:
  - name: mysql
    protocol: TCP
    port: 3306
    targetPort: 3306
  selector:
    app: mysql                 # 通过定义标签选择器,只转发请求给带有 app: mysql 的Pod
---
apiVersion: apps/v1
kind: StatefulSet
metadata:
  name: mysql
  namespace: spring-cloud
spec:
  selector:
    matchLabels:
      app: mysql
  strategy:
    type: Recreate
  template:
    metadata:
      labels:
        app: mysql
    spec:
      containers:
      - image: mysql:5.6
        name: mysql
        env:
        - name: MYSQL_ROOT_PASSWORD
          value: bocloud@2019    # 密码属于高度敏感机密,建议在生成环境中通过 ServiceAccount 和 ConfigMap 等方式注入
        ports:
        - containerPort: 3306
          name: mysql
        volumeMounts:
        - name: mysql-persistent-storage
          mountPath: /var/lib/mysql
      volumes:
      - name: mysql-persistent-storage
        persistentVolumeClaim:
          claimName: mysql-pv-claim   # 将前面定义的pvc挂载成卷,给容器使用
解释:创建 mysql 的 Service 和 StatefulSet。由于 mysql 是个数据库,属于 有状态应用 ,所以建议使用 StatefulSet 来管理。
另外由于 k8s 的机制问题,Pod 重启后IP地址会改变,所以Pod之间的通信不适合直接通过访问 Pod IP 的方式进行,最佳实践是通过创建特定 Service ,请求方的 Pod 向特定 Service 发送请求,再由特定 Service 转发请求给被请求方的 Pod。
部署微服务
在 package/templates 目录下清空 deployment.yaml 文件,然后写入以下内容:
apiVersion: apps/v1
kind: Deployment
metadata:
  name: datacenter-dep
  namespace: spring-cloud      # 同一个项目的命名空间一定要相同
  labels:
    app: datacenter            # 自定义标签
spec:
  replicas: 1                       # 副本数量
  selector:
    matchLabels:
      app: datacenter               # 通过统计有多少个带有app: datacenter的Pod来确定副本的数量
  template:
    metadata:
      labels:
        app: datacenter             # 给Pod打上app: datacenter标签,方便统计
    spec:
      containers:
      - name: school
        image: {{.Values.image.school.repository}}:{{.Values.image.school.tag}} # 注入真正的镜像
        imagePullPolicy: IfNotPresent
        env:
        - name: MYSQL_ADDRESS
          value: mysql:3306
        - name: MYSQL_PASSWORD
          value: bocloud@2019           # 密码属于高度敏感机密,不建议在真实环境使用明文密码,这里仅为展示
        ports:
        - containerPort: 8084
      - name: teacher
        image: {{.Values.image.teacher.repository}}:{{.Values.image.teacher.tag}} # 注入真正的镜像
        imagePullPolicy: IfNotPresent
        env:
        - name: MYSQL_ADDRESS
          value: mysql:3306
        - name: MYSQL_PASSWORD
          value: bocloud@2019           # 密码属于高度敏感机密,不建议在真实环境使用明文密码,这里仅为展示
        ports:
        - containerPort: 8082
      - name: student
        image: {{.Values.image.student.repository}}:{{.Values.image.student.tag}} # 注入真正的镜像
        imagePullPolicy: IfNotPresent
        env:
        - name: MYSQL_ADDRESS
          value: mysql:3306
        - name: MYSQL_PASSWORD
          value: bocloud@2019           # 密码属于高度敏感机密,不建议在真实环境使用明文密码,这里仅为展示
        ports:
        - containerPort: 8083
解释:根据 k8s 的规范要求,应该通过 Deployment 来部署 无状态应用 。
然后,在同一个目录下清空 service.yaml 文件,然后写入以下内容:
apiVersion: v1
kind: Service
metadata:
  name: datacenter
  namespace: spring-cloud
spec:
  type: ClusterIP
  selector:
    app: datacenter
  ports:
    - name: school
      protocol: TCP
      port: 8084
      targetPort: 8084
    - name: teacher
      protocol: TCP
      port: 8082
      targetPort: 8082
    - name: student
      protocol: TCP
      port: 8083
      targetPort: 8083
解释:创建 Service 暴露到集群内部,供集群内部的其他服务调用
最后,修改 package/values.yaml 文件,然后写入以下内容:
image:
  school:
    repository: datacenter-school
    tag: latest
  teacher:
    repository: datacenter-teacher
    tag: latest
  student:
    repository: datacenter-student
    tag: latest
解释:helm 推荐通过 values.yaml 文件统一管理 chart 模板的变量。
skaffold 也是通过修改 values.yaml 注入不同的镜像名称,动态更新运行中容器镜像
安装配置kubectl和docker
安装kubectl与k8s通信
版本:v1.23.0
点击上述链接,下载到本地,再讲二进制加入 PATH 环境变量,详细安装过程不再赘述。
K8S配置 一般保存在主节点的 ~/.kube 目录下,将完整目录复制到本地目录下,打开目录下的 .kube/config,可以类似的内容如下:
apiVersion: v1
clusters:
- cluster:
    certificate-authority-data: "****"  # 证书颁发机构的证书
    server: https://172.24.86.22:6443   # k8s的apiserver地址
  name: kubernetes                      # k8s集群的名称
contexts:
- context:
    cluster: kubernetes                        # 上下文的k8s集群的名称
    user: kubernetes-admin                     # 上下文的k8s凭证的用户名称
  name: kubernetes-admin@kubernetes
current-context: kubernetes-admin@kubernetes   # 设置当前上下文的所使用的k8s集群
kind: Config
preferences: {}
users:
- name: kubernetes-admin             # k8s凭证的用户名称
  user:
    client-certificate-data: "****"  # 用户证书
    client-key-data: "****"          # 用户密钥
然后设置环境变量 KUBECONFIG 指向本地的 ./kube/config 路径,kubectl 便可以通过凭证与 k8s 的 APIServer 通信。
修改环境变量后,记得运行命令更新环境变量,Windows平台执行 refreshenv 命令。
安装 docker 用于打包镜像
如果你的本地电脑环境存在docker环境,可以跳过docker安装配置环节
安装Docker客户端
点击这里,
下载到本地,再讲二进制加入 PATH 环境变量,详细安装过程不再赘述。
配置Docker
假设你的WSL环境中存在 Docker 环境,又或者远程Linux服务器上存在 Docker 环境,
可以通过修改 Docker 守护进程的配置,将 Docker 进程暴露到内网供其他设备进行使用。
首先,编辑 /etc/systemd/system/multi-user.target.wants/docker.service 文件,将 ExecStart 行改成以下内容:
ExecStart=/usr/bin/dockerd --containerd=/run/containerd/containerd.sock
重点是去掉 fd:// ,接着编辑 /etc/docker/daemon.json 文件,重点是 hosts 加上 fd:// 和 tcp://0.0.0.0:10086,
注意事项:升级docker后会覆盖当前设置,导致docker无法正常运行,需要参考上述步骤重新设置 docker.service 文件才能正常运行
端口号可以根据实际情况调整
{
  "hosts": [
    "fd://",
    "tcp://0.0.0.0:10086"
  ],
  "registry-mirrors": [
    "https://docker.mirrors.ustc.edu.cn/",
    "https://dockerhub.azk8s.cn/",
    "https://hub-mirror.c.163.com/"
  ],
  "exec-opts": ["native.cgroupdriver=systemd"],
    "log-driver": "json-file",
    "log-opts": {
      "max-size": "100m"
  },
  "storage-driver": "overlay2"
}
接口执行以下命令,重启 docker
systemctl daemon-reload
systemctl restart docker
最后,在本地设置环境变量 DOCKER_HOST=<eth0IP>:10086 ,把 <eth0IP> 换成远程Linux服务器的真实IP。
由于WSL每次重启eth0的IP会变化,需要重新设置
DOCKER_HOST变量
在本地命令行界面,执行 docker info 命令检查是否设置成功。
C:\WINDOWS\system32>docker info
Client:
 Context:    default
 Debug Mode: false
 Plugins:
  buildx: Docker Buildx (Docker Inc., v0.7.1)
  compose: Docker Compose (Docker Inc., v2.2.1)
  scan: Docker Scan (Docker Inc., 0.9.0)

Server:
 Containers: 0
  Running: 0
  Paused: 0
  Stopped: 0
 Images: 30
 Server Version: 20.10.12
 Storage Driver: overlay2
  Backing Filesystem: extfs
  Supports d_type: true
  Native Overlay Diff: true
  userxattr: false
 Logging Driver: json-file
 Cgroup Driver: systemd
 Cgroup Version: 1
 Plugins:
  Volume: local
  Network: bridge host ipvlan macvlan null overlay
  Log: awslogs fluentd gcplogs gelf journald json-file local logentries splunk syslog
 Swarm: inactive
 Runtimes: io.containerd.runc.v2 io.containerd.runtime.v1.linux runc
 Default Runtime: runc
 Init Binary: docker-init
 containerd version: 7b11cfaabd73bb80907dd23182b9347b4245eb5d
 runc version: v1.0.2-0-g52b36a2
 init version: de40ad0
 Security Options:
  seccomp
   Profile: default
 Kernel Version: 5.10.74.3-microsoft-standard-WSL2+
 Operating System: Ubuntu 20.04.3 LTS
 OSType: linux
 Architecture: x86_64
 CPUs: 8
 Total Memory: 7.239GiB
 Name: LAPTOP-MAGICBOOKPRO
 ID: EXNQ:FGLE:MROB:C7FG:WJXC:R7YV:HUFB:6A46:4KAW:LG2A:TM3J:SAAB
 Docker Root Dir: /var/lib/docker
 Debug Mode: false
 Registry: https://index.docker.io/v1/
 Labels:
 Experimental: false
 Insecure Registries:
  127.0.0.0/8
 Registry Mirrors:
  https://docker.mirrors.ustc.edu.cn/
  https://dockerhub.azk8s.cn/
  https://hub-mirror.c.163.com/
 Live Restore Enabled: false
填写skaffold配置并运行
在项目根目录下,创建 skaffold.yaml 文件,填写以下内容
apiVersion: skaffold/v2beta26	                 # version of the configuration.
kind: Config	                                 # always Config.
metadata:
  name: datacenter
build:
  local:
    push: false
  artifacts:
    - image: datacenter-school         # must match in artifactOverrides
      context: "school"
      docker:
        dockerfile: Dockerfile
    - image: datacenter-teacher        # must match in artifactOverrides
      context: "teacher"
      docker:
        dockerfile: Dockerfile
    - image: datacenter-student        # must match in artifactOverrides
      context: "student"
      docker:
        dockerfile: Dockerfile
deploy:
  helm:
    releases:
    - name: datacenter
      chartPath: package
      artifactOverrides:
        image:
          school: datacenter-school               # no tag present!
          teacher: datacenter-teacher               # no tag present!
          student: datacenter-student               # no tag present!
      imageStrategy:
        helm: {}
先执行以下命令创建 spring-cloud 命名空间,k8s 通过命名空间来隔离不同微服务的资源
kubectl create namespace spring-cloud
再执行 skaffold dev 命令,如果前面的步骤和配置都正确,应该可以看到以下输出
C:\Users\huang\Documents\datacenter>skaffold dev
time="2022-02-14T00:13:29+08:00" level=warning msg="failed to detect active kubernetes cluter node platform. Specify the correct build platform in the `skaffold.yaml` file or using the `--platform` flag" subtask=-1 task=DevLoop
Listing files to watch...
 - datacenter-eureka
 - datacenter-school
 - datacenter-teacher
 - datacenter-student
Generating tags...
 - datacenter-eureka -> datacenter-eureka:13577a5
 - datacenter-school -> datacenter-school:13577a5
 - datacenter-teacher -> datacenter-teacher:13577a5
 - datacenter-student -> datacenter-student:13577a5
Checking cache...
 - datacenter-eureka: Found. Tagging
 - datacenter-school: Found. Tagging
 - datacenter-teacher: Found. Tagging
 - datacenter-student: Found. Tagging
Tags used in deployment:
 - datacenter-eureka -> datacenter-eureka:769afdbaaf2a35acada2a56cf1d1cccbc8a8ab8196396a8ff9e2803cf6a49490
 - datacenter-school -> datacenter-school:b89167e724932d41e40945a39ff04d84e419345957c4c0a022e7c4694153b609
 - datacenter-teacher -> datacenter-teacher:9d013f9295b7bd3e75b68b2d8a9df434a77cbc9514df1ae36a967b6841c4328f
 - datacenter-student -> datacenter-student:3f5267479ce35cec929485edce5f1dfc2cb1017136bbc90f2a0de5cd4f48f808
Starting deploy...
按 Ctrl+C 即可停止服务,如果 kubernetes 集群中依旧存在 datacenter 相关的资源,可以通过 helm uninstall datacenter 手动清除。
[可选]使用Buildah代替Docker
对于 WSL1 或者 嫌弃在 WSL2 安装 docker 环境太麻烦的 windows 用户,以及不想在本地安装 docker 的 Mac 用户,
可以尝试安装 redhat 开源的 buildah
按照官方教程自行安装即可。
安装结束后运行 buildah image, 若遇到以下错误:
kernel does not support overlay fs: 'overlay' is not supported over <unknown> at "/home/zaoying/.local/share/containers/storage/overlay": backing file system is unsupported for this graph driver
WARN[0000] failed to shutdown storage: "kernel does not support overlay fs: 'overlay' is not supported over <unknown> at \"/home/zaoying/.local/share/containers/storage/overlay\": backing file system is unsupported for this graph driver"
ERRO[0000] exit status 125
只需要安装 fuse-overlayfs 即可:
# for debian/ubuntu
apt install fuse-overlayfs
buildah 基于 fork 模型,不需要 daemon 守护进程,因此不依赖于 systemd ,不需要root权限即可运行。
安装完后即可使用,不需要额外的配置。但 skaffold 尚未提供 buildah 官方支持,因此需要自定义构建脚本。
apiVersion: skaffold/v2beta26	                 # version of the configuration.
kind: Config	                                 # always Config.
metadata:
 name: datacenter
build:
 local:
   push: false
 artifacts:
   - image: datacenter-school         # must match in artifactOverrides
     context: "school"
     custom:
       buildCommand: |
         buildah bud -t $IMAGE -f .
   - image: datacenter-teacher        # must match in artifactOverrides
     context: "teacher"
     custom:
       buildCommand: |
         buildah bud -t $IMAGE -f .
   - image: datacenter-student        # must match in artifactOverrides
     context: "student"
     custom:
       buildCommand: |
         buildah bud -t $IMAGE -f .
deploy:
 helm:
   releases:
   - name: datacenter
     chartPath: package
     artifactOverrides:
       image:
         school: datacenter-school               # no tag present!
         teacher: datacenter-teacher               # no tag present!
         student: datacenter-student               # no tag present!
     imageStrategy:
       helm: {}
更多详细的自定义构建器帮助,请查看官方文档
[可选]代码热更新
代码热更新在日常的开发过程非常实用,可以加快特性开发与功能验证的效率。
skaffold 可以解析 Dockerfile ,根据 COPY 和 ADD 等指令,自动选择监听和同步哪些文件。
当修改完代码后,手动执行 mvn clean & mvn package 命令,skaffold 监听jar包变动,自动重新打包镜像并替换。
整个过程算不上真正意思上的热更新,主要的原因是 spring boot 通过 jar 包部署,每次只做了很小的改动都需要重新打包镜像,耗费非常多的时间。
如果改为 exploded war 的方式部署,就可以实现 class 粒度的 热更新 。
直接跳过 mvn package 打包环节,直接将编译的中间产物 .class 字节码文件同步到运行中的容器中,从而在不重启容器的前提下实现代码热更新。
理论上来说,skaffold 的代码热更新功能同时适用于
Java和Javascript等技术栈。但限于篇幅,本文仅限于Java。
首先要改造 pom.xml 配置,把 <package>jar</package> 改成 <package>war</package>
<packaging>war</packaging>
然后加上 spring-boot-starter-tomcat ,scope 改为 provided,以及增加 start-class 属性,填写全路径的启动类
  ...
	<properties>
    ...
		<start-class>com.springcloud.eureka.SchoolApplication</start-class>
    ...
	</properties>
  ...
  <dependencys>
    ...
    <dependency>
      <groupId>org.springframework.boot</groupId>
      <artifactId>spring-boot-starter-tomcat</artifactId>
      <scope>provided</scope>
    </dependency>
    ...
  </dependencys>
打开启动类 SpringApplication.java ,增加 extends SpringBootServletInitializer 并重载 configure 方法
@SpringBootApplication
@EnableEurekaClient
@EnableFeignClients
public class SchoolApplication extends SpringBootServletInitializer {
	@Override
	protected SpringApplicationBuilder configure(SpringApplicationBuilder application) {
	   return application.sources(SchoolApplication.class);
	}

	public static void main(String[] args) {
		SpringApplication.run(SchoolApplication.class, args);
	}
}
接着,修改 Dockerfile, 如果你不愿意在生产环境采用 war ,这里可以另存为 Dockerfile.dev
FROM tomcat:9.0.62-jre11-temurin-focal
RUN rm -rf /usr/local/tomcat/webapps.dist
# 通过修改server.xml的方式修改端口
RUN sed -i 's/redirectPort="8443"//' /usr/local/tomcat/conf/server.xml && sed -i 's/8005/8004/' /usr/local/tomcat/conf/server.xml && sed -i 's/8080/8084/' /usr/local/tomcat/conf/server.xml
COPY target/exploded /usr/local/tomcat/webapps/ROOT
COPY target/classes /usr/local/tomcat/webapps/ROOT/WEB-INF/classes
CMD ["catalina.sh", "run"]
以上操作都是针对单个服务,因此每个服务都要重复一遍上述操作,但以下操作则是针对整体服务。
最后修改 skaffold.yaml ,增加自定义构建脚本
apiVersion: skaffold/v2beta26	                 # version of the configuration.
kind: Config	                                 # always Config.
metadata:
  name: datacenter
build:
  local:
    push: false
  artifacts:
    - image: datacenter-eureka         # must match in artifactOverrides
      context: "eureka"
      custom:
        buildCommand: |
          mvn clean package && 7z x target/eureka-0.0.1-SNAPSHOT.war -otarget/exploded && docker build -t %IMAGE% -f Dockerfile.dev %BUILD_CONTEXT%
        dependencies:
          paths:
          - target/classes
          - Dockerfile.dev
          ignore:
          - target/exploded
    - image: datacenter-school         # must match in artifactOverrides
      context: "school"
      custom:
        buildCommand: |
          mvn clean package && 7z x target/school-0.0.1-SNAPSHOT.war -otarget/exploded && docker build -t %IMAGE% -f Dockerfile.dev %BUILD_CONTEXT%
        dependencies:
          paths:
          - target/classes
          - Dockerfile.dev
          ignore:
          - target/exploded
    - image: datacenter-teacher        # must match in artifactOverrides
      context: "teacher"
      custom:
        buildCommand: |
          mvn clean package && 7z x target/teacher-0.0.1-SNAPSHOT.war -otarget/exploded && docker build -t %IMAGE% -f Dockerfile.dev %BUILD_CONTEXT%
        dependencies:
          paths:
          - target/classes
          - Dockerfile.dev
          ignore:
          - target/exploded
    - image: datacenter-student        # must match in artifactOverrides
      context: "student"
      custom:
        buildCommand: |
          mvn clean package && 7z x target/student-0.0.1-SNAPSHOT.war -otarget/exploded && docker build -t %IMAGE% -f Dockerfile.dev %BUILD_CONTEXT%
        dependencies:
          paths:
          - target/classes
          - Dockerfile.dev
          ignore:
          - target/exploded
deploy:
  helm:
    releases:
    - name: datacenter
      chartPath: package
      artifactOverrides:
        image:
          eureka: datacenter-eureka               # no tag present!
          school: datacenter-school               # no tag present!
          teacher: datacenter-teacher               # no tag present!
          student: datacenter-student               # no tag present!
      imageStrategy:
        helm: {}
图中所展示的 buildCommand 是在 Windows 平台执行的,如果是 Linux 或 MacOS,请参考以下命令
# 打包eureka
mvn clean package && unzip target/eureka-0.0.1-SNAPSHOT.war -o target/exploded && docker build -t $IMAGE -f Dockerfile.dev $BUILD_CONTEXT

# 打包school
mvn clean package && unzip target/school-0.0.1-SNAPSHOT.war -o target/exploded && docker build -t $IMAGE -f Dockerfile.dev $BUILD_CONTEXT

# 打包teacher
mvn clean package && unzip target/teacher-0.0.1-SNAPSHOT.war -o target/exploded && docker build -t $IMAGE -f Dockerfile.dev $BUILD_CONTEXT

# 打包student
mvn clean package && unzip target/student-0.0.1-SNAPSHOT.war -o target/exploded && docker build -t $IMAGE -f Dockerfile.dev $BUILD_CONTEXT
仅第一次运行需要打包 war 再解压的操作,后续可通过 mvn compile 即可以 class 为粒度实现 热更新
总结
本次演示所使用的微服务项目是很多年前笔者为了学习 Spring Cloud 而编写的 Demo 。
时隔多年 Spring Cloud 已经不再推荐 Eureka 作为服务发现与注册中心。
同时 k8s 本身也支持将 CoreDNS 作为服务发现/注册的组件使用。
所以读者不必纠结 Demo 代码中的错误,因为本文的重点是 skaffold 的配置与使用。